Creating Global Session Variables for all Activities Android Example

Here is an Android example of how to share variables through out your activities and your project. There is many ways including preferences, extending from a base activity or using  a database to share variables. I like this one because it can be accessed through the whole project and it is easy to implement. The down side is that the variables are only available through a session. For example if the user restarts the application then all the variable will also be cleared. So they can be viewed as session variables.

GlobalState Class:

-Note this extends Application

import android.app.Application;

public class GlobalState extends Application{
	
	 public File sd = null;
	 boolean refresh = true;
	 pictureData [] picturemarkers = null;
	 
	 public File getFilePath(){
		 return sd;
	 }
	 
	 public void setFilePath(File sd){
          this.sd = sd;		 
	 }

	 public pictureData[] getPictureData(){
		 return picturemarkers;
	 }
	  
	 public void setPictureData(pictureData [] picData){
		 picturemarkers = picData;
	 }
	 
	 public void setRefresh(boolean refresh){
		 this.refresh = refresh;
	 }
	 
	 public boolean getRefresh(){
		 return refresh;
	 }
			 
}

ExampleActivity Class:

public class ExampleActivity extends Activity {

        GlobalState gs;

	public void onCreate(Bundle savedInstanceState) {
              gs = (GlobalState) getApplication();
        }

        public void examples(){  
            File temp = gs.getFilePath();
            if(gs.refresh()){
                gs.setRefresh(false);
             }
        }
} 


Manifest

-I do not fully understand why but it is needed for it to work.  Set the ‘name’ of your application to the path where the file is located.

<application
        android:name="your.package.name.GlobalState"

How to use static variables in activities

As previously described in Leaving an Android application, when you exit an app by pressing back button its resources are not completely destroyed immediately.

I would like to explain a concrete mistake I met multiple times, in connection with this behavior, which is easy to commit, if you forget this.

When you use static member variables in an activity you, should think about, how static variables are handled when instantiating, and how android instantiates activities.

If a static variable has an initial value it is only applied when creating the first instance. When the activity is started, when starting from app browser or by an Intent programmatically by you it becomes instantiated. When the app is first started, the first instance will be created, so obviously the static variables will get the initial values.

During the run the static variables may be killed if the activity they belong to are not visible, in this case they will have their default values when returning to the activity. If you want to restore their values in this case from some kind of stored source read this article: Maintaining global Application state

And the problem I recently met, that the opposite can also happen, the static variables may keep their values when you did not expect this. It is very easy to confirm this, just exit the application by pressing back and quickly restart it from the app browser. In such a sort time the android system will not kill the entire activity, and static variables will retain values.

So you should think over why the variable become static, to decide if it is the desired behavior for you or not. For example you can reinitialize the static variables in onCreate or onResume methods if that fits you.

How to get QuickTime Pro – FREE!!! –

STEP 1: Download QuickTime from …

http://www.apple.com/quicktime/d.

STEP 2: Open QuickTime Player.

STEP 3: GOTO Edit – Preferences – Register.

STEP 4: Enter username and password.

Pc Serials:
Registered To: CORE MAFIA
Registration Code: DFXY-5TJN-HU3N-DQXF-WDQ3

Register Name: Dawn M Fredette
Register Code: 4UJ2-5NLF-HFFA-9JW3-X2KV
===========================================
Mac Users:
Registered To: Pablo/nop
Registration code:
SMH2-6F4K-8SK9-ST5W-QKU3

===========================================
Others:
Register Name = In Memory of Abysm
Register Code = YBN7Y-9K77Y-F67B5-PNCCQ

Register Name: http://www.macmofo.com
Register Code: 3DX76-9KJ4F-CBQL9-BJBKH

Registered To: Apple Sales
Registration Code: TTVN-B66S-28V6-X84D-EBWN
===========================================

Disclaimer – This Info is for educational use it is not intentioned nor was it made in order to cause any infringements with the original creator of the software

THAT’S IT!
Hope This Helps.
datroubleshooter.

Quantity Strings (Plurals)

Quantity Strings (Plurals)


Different languages have different rules for grammatical agreement with quantity. In English, for example, the quantity 1 is a special case. We write “1 book”, but for any other quantity we’d write “n books”. This distinction between singular and plural is very common, but other languages make finer distinctions. The full set supported by Android is zero, one, two, few, many, and other.

The rules for deciding which case to use for a given language and quantity can be very complex, so Android provides you with methods such as getQuantityString() to select the appropriate resource for you.

Although historically called “quantity strings” (and still called that in API), quantity strings should only be used for plurals. It would be a mistake to use quantity strings to implement something like Gmail’s “Inbox” versus “Inbox (12)” when there are unread messages, for example. It might seem convenient to use quantity strings instead of an if statement, but it’s important to note that some languages (such as Chinese) don’t make these grammatical distinctions at all, so you’ll always get the other string.

The selection of which string to use is made solely based on grammatical necessity. In English, a string for zero will be ignored even if the quantity is 0, because 0 isn’t grammatically different from 2, or any other number except 1 (“zero books”, “one book”, “two books”, and so on). Conversely, in Korean only the other string will ever be used.

Don’t be misled either by the fact that, say, two sounds like it could only apply to the quantity 2: a language may require that 2, 12, 102 (and so on) are all treated like one another but differently to other quantities. Rely on your translator to know what distinctions their language actually insists upon.

It’s often possible to avoid quantity strings by using quantity-neutral formulations such as “Books: 1”. This will make your life and your translators’ lives easier, if it’s a style that’s in keeping with your application.

Note: A plurals collection is a simple resource that is referenced using the value provided in the name attribute (not the name of the XML file). As such, you can combine plurals resources with other simple resources in the one XML file, under one <resources> element.

file location:
res/values/filename.xml
The filename is arbitrary. The <plurals> element’s name will be used as the resource ID.
resource reference:
In Java: R.plurals.plural_name
syntax:
<?xml version="1.0" encoding="utf-8"?>
<resources>
    <plurals
        name="plural_name">
        <item
            quantity=["zero" | "one" | "two" | "few" | "many" | "other"]
            >text_string</item>
    </plurals>
</resources>
elements:
<resources>
Required. This must be the root node.No attributes.

<plurals>
A collection of strings, of which, one string is provided depending on the amount of something. Contains one or more <item> elements.

attributes:

name
String. A name for the pair of strings. This name will be used as the resource ID.
<item>
A plural or singular string. The value can be a reference to another string resource. Must be a child of a <plurals> element. Beware that you must escape apostrophes and quotation marks. See Formatting and Styling, below, for information about to properly style and format your strings.

attributes:

quantity
Keyword. A value indicating when this string should be used. Valid values, with non-exhaustive examples in parentheses:

Value Description
zero When the language requires special treatment of the number 0 (as in Arabic).
one When the language requires special treatment of numbers like one (as with the number 1 in English and most other languages; in Russian, any number ending in 1 but not ending in 11 is in this class).
two When the language requires special treatment of numbers like two (as with 2 in Welsh, or 102 in Slovenian).
few When the language requires special treatment of “small” numbers (as with 2, 3, and 4 in Czech; or numbers ending 2, 3, or 4 but not 12, 13, or 14 in Polish).
many When the language requires special treatment of “large” numbers (as with numbers ending 11-99 in Maltese).
other When the language does not require special treatment of the given quantity (as with all numbers in Chinese, or 42 in English).
example:
XML file saved at res/values/strings.xml:

<?xml version="1.0" encoding="utf-8"?>
<resources>
    <plurals name="numberOfSongsAvailable">
        <!--
             As a developer, you should always supply "one" and "other"
             strings. Your translators will know which strings are actually
             needed for their language. Always include %d in "one" because
             translators will need to use %d for languages where "one"
             doesn't mean 1 (as explained above).
          -->
        <item quantity="one">%d song found.</item>
        <item quantity="other">%d songs found.</item>
    </plurals>
</resources>

XML file saved at res/values-pl/strings.xml:

<?xml version="1.0" encoding="utf-8"?>
<resources>
    <plurals name="numberOfSongsAvailable">
        <item quantity="one">Znaleziono %d piosenkę.</item>
        <item quantity="few">Znaleziono %d piosenki.</item>
        <item quantity="other">Znaleziono %d piosenek.</item>
    </plurals>
</resources>

Java code:

int count = getNumberOfsongsAvailable();
Resources res = getResources();
String songsFound = res.getQuantityString(R.plurals.numberOfSongsAvailable, count, count);

When using the getQuantityString() method, you need to pass the count twice if your string includes string formatting with a number. For example, for the string %d songs found, the first count parameter selects the appropriate plural string and the second count parameter is inserted into the %d placeholder. If your plural strings do not include string formatting, you don’t need to pass the third parameter to getQuantityString.

Formatting and Styling


Here are a few important things you should know about how to properly format and style your string resources.

Escaping apostrophes and quotes

If you have an apostrophe or a quote in your string, you must either escape it or enclose the whole string in the other type of enclosing quotes. For example, here are some stings that do and don’t work:

<string name="good_example">"This'll work"</string>
<string name="good_example_2">This\'ll also work</string>
<string name="bad_example">This doesn't work</string>
<string name="bad_example_2">XML encodings don&apos;t work</string>

Formatting strings

If you need to format your strings using String.format(String, Object...), then you can do so by putting your format arguments in the string resource. For example, with the following resource:

<string name="welcome_messages">Hello, %1$s! You have %2$d new messages.</string>

In this example, the format string has two arguments: %1$s is a string and %2$d is a decimal number. You can format the string with arguments from your application like this:

Resources res = getResources();
String text = String.format(res.getString(R.string.welcome_messages), username, mailCount);

Fragment MyFragment not attached to Activity

If you call method getString() or getResources() or getActivity(). You get this error if your fragment hasnt been attach to the activity yet.

E.g:

private horizontalTabTitles = new String[]{getString(R.string.sort_by_time),
getString(R.string.sort_by_table), getString(R.string.sort_by_order)};

when you declare and initialize this, the fragment may not has been attached to the activity yet. hence cause the error.

Android localization at runtime

AndroidLocalize .java

  1. Declare spinner control, locale and button objects
  2. Find the spinner control from main.xml and add OnItemSelectedListener class to it
  3. Based on the list item selected, call setLocale method with the Locale value: English – en, Tamil – ta and Hindi – hi.
  4. Change the configuration of device (add locale) for your application
  5. Make sure that you refresh the current activity to reflect the changes made in configuration
package com.prgguru.android;
import java.util.Locale;
import android.os.Bundle;
import android.app.Activity;
import android.content.Intent;
import android.content.res.Configuration;
import android.content.res.Resources;
import android.util.DisplayMetrics;
import android.view.View;
import android.widget.AdapterView;
import android.widget.Button;
import android.widget.Spinner;
import android.widget.Toast;
import android.widget.AdapterView.OnItemSelectedListener;
public class AndroidLocalize extends Activity {
    Spinner spinnerctrl;
    Button btn;
    Locale myLocale;
    @Override
    public void onCreate(Bundle savedInstanceState) {
        super.onCreate(savedInstanceState);
        setContentView(R.layout.main);
        spinnerctrl = (Spinner) findViewById(R.id.spinner1);
        spinnerctrl.setOnItemSelectedListener(new OnItemSelectedListener() {
            public void onItemSelected(AdapterView<?> parent, View view,
                    int pos, long id) {
                if (pos == 1) {
                    Toast.makeText(parent.getContext(),
                            "You have selected Tamil", Toast.LENGTH_SHORT)
                            .show();
                    setLocale("ta");
                } else if (pos == 2) {
                    Toast.makeText(parent.getContext(),
                            "You have selected Hindi", Toast.LENGTH_SHORT)
                            .show();
                    setLocale("hi");
                } else if (pos == 3) {
                    Toast.makeText(parent.getContext(),
                            "You have selected English", Toast.LENGTH_SHORT)
                            .show();
                    setLocale("en");
                }
            }
            public void onNothingSelected(AdapterView<?> arg0) {
                // TODO Auto-generated method stub
            }
        });
    }
    public void setLocale(String lang) {
        myLocale = new Locale(lang);
        Resources res = getResources();
        DisplayMetrics dm = res.getDisplayMetrics();
        Configuration conf = res.getConfiguration();
        conf.locale = myLocale;
        res.updateConfiguration(conf, dm);
        Intent refresh = new Intent(this, AndroidLocalize.class);
        startActivity(refresh);
    }
}

Radiobutton in Android

package com.mkyong.android;
 
import android.app.Activity;
import android.os.Bundle;
import android.view.View;
import android.view.View.OnClickListener;
import android.widget.Button;
import android.widget.RadioButton;
import android.widget.RadioGroup;
import android.widget.Toast;
 
public class MyAndroidAppActivity extends Activity {
 
  private RadioGroup radioSexGroup;
  private RadioButton radioSexButton;
  private Button btnDisplay;
 
  @Override
  public void onCreate(Bundle savedInstanceState) {
	super.onCreate(savedInstanceState);
	setContentView(R.layout.main);
 
	addListenerOnButton();
 
  }
 
  public void addListenerOnButton() {
 
	radioSexGroup = (RadioGroup) findViewById(R.id.radioSex);
	btnDisplay = (Button) findViewById(R.id.btnDisplay);
 
	btnDisplay.setOnClickListener(new OnClickListener() {
 
		@Override
		public void onClick(View v) {
 
		        // get selected radio button from radioGroup
			int selectedId = radioSexGroup.getCheckedRadioButtonId();
 
			// find the radiobutton by returned id
		        radioSexButton = (RadioButton) findViewById(selectedId);
 
			Toast.makeText(MyAndroidAppActivity.this,
				radioSexButton.getText(), Toast.LENGTH_SHORT).show();
 
		}
 
	});
 
  }
}

Android get type of a view

if (view instanceof ImageView) {
    ImageView imageView = (ImageView) view;
    // do what you want with imageView
}
else if (view instanceof TextView) {
    TextView textView = (TextView) view;
    // do what you want with textView
}
else if ...
Or 
View view=FLall.getChildAt(i);
Log.i("ViewName",getClass().getName());
 

Android Toast

An Android Toast is a small message displayed on the screen, similar to a tool tip or other similar popup notification. A Toast is displayed on top of the main content of an activity, and only remains visible for a short time period. This screenshot shows how a Toast looks like on the screen:

A screenshot of a Toast displayed on an Android device.The Toast is shown at the bottom of the screen in the above screenshot (but you can change that).

Creating a Toast

Here is an Android Toast example:

Toast toast = Toast.makeText(getApplicationContext(),
        "This is a message displayed in a Toast",
        Toast.LENGTH_SHORT);
    
toast.show();

The Toast.makeText() method is a factory method which creates a Toast object. The method takes 3 parameters. First the methods needs a Context object which is obtained by calling getApplicationContext(). Note: The getApplicationContext() method is a method that exists inside activities, so the above code has to be located in an Activity subclass to work.

The second parameter is the text to be displayed in the Toast. The third parameter is the time duration the Toast is to be displayed. The Toast class contains two predefined constants you can use: Toast.LENGTH_SHORT and Toast.LENGTH_LONG. You will have to experiment with these two values to see which fits your situation better.

Toast Positioning

You can change the positioning on the screen of a Toast message using the setGravity() method. Here is a Toast setGravity() example:

toast.setGravity(Gravity.CENTER, 0, 0);

The first parameter of the setGravity() method specifies the overall position of the Toast. You can use the following constants in the Gravity class to specify the overall position:

  • TOP
  • BOTTOM
  • LEFT
  • RIGHT
  • CENTER
  • CENTER_HORIZONTAL
  • CENTER_VERTICAL

Each of these constants defines the position in either the X or Y direction, except for the CENTER constant which implies centered both horizontally and vertically. You can combine these constants using the | (or) operator, like this:

toast.setGravity(Gravity.TOP | Gravity.CENTER_HORIZONTALLY, 0, 0);

The two other parameters of the setGravity() method are an X and Y offset to the position defined by the Gravity constant. If, for instance, you need the Toast to be displayed at the top, centered horizontally, but 20 pixels down from the top position, you would use this setGravity() call:

toast.setGravity(Gravity.TOP | Gravity.CENTER_HORIZONTALLY, 0, 20);

Toast Custom Views

It is possible to define a custom View for your Toast. To do so, first you must create a layout XML file for the custom View. Here is an example Toast layout XML file:

<?xml version="1.0" encoding="utf-8"?>
    <LinearLayout xmlns:android="http://schemas.android.com/apk/res/android"
                  android:id="@+id/toast_root_view"
                  android:orientation="vertical" android:layout_width="match_parent"
                  android:layout_height="match_parent"
                  android:background="@android:color/background_dark"
                  android:padding="16dp"
            >

        <TextView
                android:id="@+id/toast_header"
                android:textSize="20dp"
                android:textColor="@android:color/primary_text_dark"
                android:layout_width="match_parent"
                android:layout_height="match_parent" />

        <TextView
                android:id="@+id/toast_body"
                android:textColor="@android:color/primary_text_dark"
                android:layout_width="match_parent"
                android:layout_height="match_parent" />

    </LinearLayout>

Put this layout XML file into your Android project’s /app/src/main/res/layout directory and name the file my_toast.xml .

To use this layout XML file with a Toast you write this code:

LayoutInflater inflater = getLayoutInflater();

View toastLayout = inflater.inflate(R.layout.my_toast,
        (ViewGroup) findViewById(R.id.toast_root_view));

TextView header = (TextView) toastLayout.findViewById(R.id.toast_header);
header.setText("Message for you:");

TextView body = (TextView) toastLayout.findViewById(R.id.toast_body);
body.setText("You have got mail!");

Toast toast = new Toast(getApplicationContext());
toast.setGravity(Gravity.CENTER, 0, 0);
toast.setDuration(Toast.LENGTH_LONG);
toast.setView(toastLayout);
toast.show();

First you obtain the LayoutInflater. You use that to inflate (create) the View defined by your the layout XML file named my_toast.xml (referred to by R.layout.my_toast).

Notice the findViewById(R.id.toast_root_view) call as the second parameter to the inflate() method call. This finds the root ViewGroup in the my_toast.xml layout XML file (the root ViewGroup has the id toast_view_group). This call is necessary for the inflated View to know what the root ViewGroup inside the inflated View is.

Once the View is created, you obtain the two TextView components from the View and set their texts.

Finally, you create a Toast object, set its gravity (position / alignment), its duration, its View and then show it.

Here is how the Toast above looks when displayed:

A Toast with a custom View.

Android User Interface Design: Relative Layouts

Understanding layouts is important for good Android application design. In this tutorial, you learn all about relative layouts, which organize user interface controls, or widgets, on the screen in relation to one another, or to their parent layout. When used correctly, relative layouts can be the powerful and flexible layout upon which many interesting Android application user interfaces can be designed.

After linear layouts, which display controls in a single row or column, relative layouts are one of the more common types of layouts used by Android user interface designers. Much like other layouts, relative layouts can be defined within XML layout resources or programmatically in the application’s Java code. The relative layout works much as its name implies: it organizes controls relative to one another, or to the parent control itself.

What does this mean? It means that child controls, such as ImageView, TextView ,and Button controls, can be placed above, below, to the left or right, of one another. Child controls can also be placed in relation to the parent (the relative layout container), including placement of controls aligned to the top, bottom, left or right edges of the layout.

Relative layout child control placement is defined using rules. These rules define how the controls within the relative layout are displayed. For the complete list of rules for relative layouts, see the Android SDK documentation for the RelativeLayout class. The associated XML attributes for use in XML resources are also defined in the documentation.

NOTE: Rules require that each child control has its id attribute set properly.

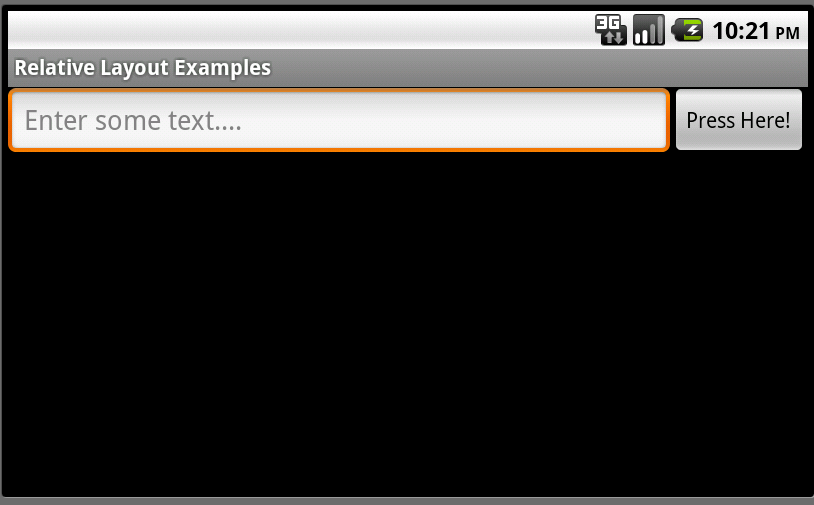
Relative layouts are best explained using an example. Let’s say we want to design a screen with an EditText control and a Button control. We want the Button to display to the right of the EditText control. Therefore, we could define a relative layout with two child controls: the EditText and the Button. The EditText control might have a rule that says: align this control in the to the left-hand side of the parent control (the layout) and to the left of a second control-a Button control. Meanwhile, the Button control might have a rule that says: align this control to the right-hand side of the parent control (the layout).

The following figures show just such a relative layout, displayed in portrait or landscape mode. The relative layout has two child controls: an EditText control and a Button control.

The most convenient and maintainable way to design application user interfaces is by creating XML layout resources. This method greatly simplifies the UI design process, moving much of the static creation and layout of user interface controls and definition of control attributes, to the XML, instead of littering the code.

XML layout resources must be stored in the /res/layout project directory hierarchy. Let’s take a look at the relative layout introduced in the previous section. This layout resource file, aptly named /res/layout/relative.xml, is defined in XML as follows:

Recall that, from within the Activity, only a single line of code within the onCreate() method is necessary to load and display a layout resource on the screen. If the layout resource was stored in the /res/layout/relative.xml file, that line of code would be:

This relative layout has its width and height set to fill the screen and three rules configured on its child controls:

  • EditText01: Align to the left-hand side of the layout
  • EditText01: Display to the left of Button01
  • Button01: Align to the right-hand side of the layout

You can also programmatically create and configure relative layouts. This is done using the RelativeLayout class (android.widget.Relative). You’ll find the child-specific parameters in the RelativeLayout.LayoutParams class. Also, the typical layout parameters (android.view.ViewGroup.LayoutParams), such as layout_height and layout_width, as well as margin parameters (ViewGroup.MarginLayoutParams), still apply to RelativeLayout objects.
Instead of loading a layout resource directly using the setContentView() method as shown earlier, you must instead build up the screen contents in Java and then supply a parent layout object which contains all the control contents to display as child views to the setContentView() method. In this case, your parent layout would be the relative layout.
For example, the following code illustrates how to programmatically have an Activity instantiate a RelativeLayout and place a TextView and a Button control within it in its onCreate() method, much like the one shown in the previous section:

Let’s take a closer look at the Java code listing above. First we create an EditText control as normal. We give it some RelativeLayout parameters, and then set its rules. In this case, we create two rules for the EditText control.

Next, we create a Button control and set its rule (align to the right-hand edge of the parent layout). Finally, we create a RelativeLayout object, set its parameters, add the two child controls using the addView() method and load the relative layout to display using the setContentView() method.

As you can see, the code can rapidly grow in size as more controls are added to the screen. For organization and maintainability, defining and using layouts programmatically is best left for the odd case rather than the norm.

Now let’s talk a bit about the attributes that help configure a relative layout and its child controls. Some specific attributes apply to relative layouts-namely the child rules, including:

  • Rules for child control centering within the parent layout, including: center horizontally, center vertically, or both.
  • Rules for child control alignment within the parent layout, including: align with top, bottom, left or right edge of another control.
  • Rules for child control alignment in relation to other child controls, including: align with top, bottom, left or right edge.
  • Rules for child control placement in relation to other child controls, including: placement to the left or right of a specific control, or above or below another control.

Also, general ViewGroup-style attributes apply to relative layouts. These include:

  • Generic Layout Parameters such as layout_height (required) and layout_width (required) (class: ViewGroup.LayoutParams)
  • Margin Layout Parameters such as margin_top, margin_left, margin_right and margin_bottom (class: ViewGroup. MarginLayoutParams)
  • Layout Parameters such as layout_height and layout_width (class: ViewGroup.LayoutParams)

Now let’s put some of these rules into action!

Let’s look at a more complex screen design. For the purposes of this exercise, we will start by looking at the final screen design, and then will work backwards, discussing the relative layout features and rules used to achieve this final result.

Let’s say we want to design a screen that looks like this:

In order to design this screen using a relative layout, continue with the following steps.

First, define a relative layout in your XML resource file. Since you want this layout to control the contents of the entire screen, set its height and width attributes to fill_parent. Your XML resource file should now look something like this:

Next, we determine what child controls we need. In this case, we need seven TextView controls (one for each color). Configure them as you normally would, setting text attributes to strings, background colors, font sizes, etc. Place each of these controls within your relative layout.

Next, we define the rules for each child control, in order to get them to draw in the appropriate places:

  • The RED TextView control has no specific settings configured. By default, this control will be drawn in the upper left-hand corner of the parent layout.
  • The ORANGE TextView control is centered horizontally in the parent layout. Because all controls default to the top left-hand corner of the screen, this effectively anchors the control to the top middle edge of the parent layout.
  • The YELLOW TextView control is aligned to the right-hand edge of the parent layout. Because all controls default to the top left-hand corner of the screen, this effectively anchors the control to the top right corner of the parent layout.
  • The GREEN TextView control is centered vertically within the parent layout and configured to display to the left of the BLUE TextView control.
  • The BLUE TextView control is aligned to the center (horizontally and vertically) of the parent control. This displays it in the middle of the screen.
  • The INDIGO TextView control is centered vertically within the parent layout and configured to display to the right of the BLUE TextView control.
  • The VIOLET TextView control is aligned to the bottom edge of the parent layout. It’s width is also set to fill the parent, allowing it to stretch across the bottom edge of the screen.

If you define these rules in your XML resource file, it should now look something like this:

Here are some tips for working with relative layouts.

  • Relative layout child controls must have unique id attributes for rules to apply correctly.
  • Watch out for circular rules. Circular rules occur when two controls have rules that point at one another. If you include a circular set of rules in your layout design, you’ll get the following error:

    It can be helpful to recall that the relative layout rules are applied in one pass.

  • Keep your relative layout rules to a minimum. This helps reduce the chance of circular rules and makes your layout more manageable and flexible.
  • As usual, remember to test that your layout design works as expected in both portrait and landscape modes, as well as on different screen sizes and resolutions.
  • Use relative layouts instead of nesting linear layouts to improve application performance and responsiveness.

Android application user interfaces are defined using layouts, and relative layouts are one of the layout types used to make application screens that are both flexible and powerful. The relative layout allows child controls to be organized in relative to one another and relative to the parent (edges and centered vertically and horizontally). Once you master the rules of how relative layouts, they can be incredibly versatile, allowing you to create complex layouts without the overhead of nesting different layouts, thus improving performance.