|
|
Original white: #FFFFFF 50% of white: #80FFFFFF. Follow the table below
|
Monthly Archives: April 2015
RecyclerView
A better way to display collections in Android
Android now offers the new RecyclerView widget, a new and improved view group for displaying collections. This guide explains how to use and customize RecyclerView in Xamarin.Android applications.
Overview
Many apps need to display collections of the same type (such as messages, contacts, images, or songs); often, this collection is too large to fit on the screen, so the collection is presented in a small window that can smoothly scroll through all items in the collection. RecyclerView is an Android widget that displays a collection of items in a list or a grid, enabling the user to scroll through the collection. The following is a screenshot of an example app that uses RecyclerView to display email inbox contents in a vertical scrolling list:

RecyclerView offers two compelling features:
- It has a flexible architecture that lets you modify its behavior by plugging in your preferred components.
- It is efficient with large collections because it reuses item views and requires the use of view holders to cache view references.
This guide explains how to use RecyclerView in Xamarin.Android applications; it explains how to add the RecyclerView package to your Xamarin.Android project, and it describes how RecyclerView functions in a typical application. Real code examples are provided to show you how to integrate RecyclerView into your application, how to implement item-view click, and how to refresh RecyclerView when its underlying data changes. This guide assumes that you are familiar with Xamarin.Android development.
Requirements
Although RecyclerView is often associated with Android 5.0 Lollipop, it is offered as a support library – RecyclerView works with apps that target API level 7 (Android 2.1) and later. The following is required to use RecyclerViewin Xamarin-based applications:
- Xamarin.Android – Xamarin.Android 4.20 or later must be installed and configured with either Visual Studio or Xamarin Studio. If you are using Xamarin Studio, version 5.5.4 or later is required.
- Your app project must include theXamarin.Android.Support.v7.RecyclerView package. For more information about installing NuGet packages, see Walkthrough: Including a NuGet in your project.
Introducing RecyclerView
RecyclerView can be thought of as a replacement for the ListView andGridView widgets in Android. Like its predecessors, RecyclerView is designed to display a large data set in a small window, but RecyclerViewoffers more layout options and is better optimized for displaying large collections. If you are familiar with ListView, there are several important differences between ListView and RecyclerView:
- RecyclerView is slightly more complex to use: you have to write more code to use RecyclerView compared to ListView.
- RecyclerView does not provide a predefined adapter; you must implement the adapter code that accesses your data source. However, Android includes several predefined adapters that work with ListViewand GridView.
- RecyclerView does not offer an item-click event when a user taps an item; instead, item-click events are handled by helper classes. By contrast, ListView offers an item-click event.
- RecyclerView enhances performance by recycling views and by enforcing the view-holder pattern, which eliminates unnecessary layout resource lookups. Use of the view-holder pattern is optional in ListView.
- RecyclerView is based on a modular design that makes it easier to customize. For example, you can plug in a different layout policy without significant code changes to your app. By contrast, ListView is relatively monolithic in structure.
- RecyclerView includes built-in animations for item add and remove.ListView animations require some additional effort on the part of the app developer.
To understand how RecyclerView works in a typical application, we’ll explore the RecyclerViewer sample app, a simple code example that usesRecyclerView to display a large collection of photos:

This app uses CardView to implement each photograph item in theRecyclerView layout. Because of RecyclerView‘s performance advantages, this sample app is able to quickly scroll through a large collection of photos smoothly and without noticeable delays.
RecyclerView Helper Classes
RecyclerView handles some tasks internally (such as the scrolling and recycling of views), but it is essentially a manager that coordinates helper classes to display a collection. RecyclerView delegates tasks to the following helper classes:
Adapter– Inflates item layouts (instantiates the contents of a layout file) and binds data to views that are displayed within a RecyclerView. The adapter also reports item-click events.LayoutManager– Measures and positions item views within aRecyclerView and manages the policy for view recycling.ViewHolder– Looks up and stores view references. The view holder also helps with detecting item-view clicks.ItemDecoration– Allows your app to add special drawing and layout offsets to specific views for drawing dividers between items, highlights, and visual grouping boundaries.ItemAnimator– Defines the animations that take place during item actions or as changes are made to the adapter.
The relationship between the RecyclerView, LayoutManager, and Adapterclasses is depicted in the following diagram.

As this figure illustrates, the LayoutManager can be thought of as the intermediary between the Adapter and the RecyclerView. The LayoutManagermakes calls into Adapter methods on behalf of the RecyclerView. For example, the LayoutManager calls an Adapter method when it is time to create a new view for a particular item position in the RecyclerView. TheAdapter inflates the layout for that item and creates a ViewHolder instance (not shown) to cache references to the views at that position. When theLayoutManager calls the Adapter to bind a particular item to the data set, theAdapter locates the data for that item, retrieves it from the data set, and copies it to the associated item view.
When using RecyclerView in your app, creating derived types of the following classes is required:
RecyclerView.Adapter– Provides a binding from your app’s data set (which is specific to your app) to item views that are displayed within the RecyclerView. The adapter knows how to associate each item-view position in the RecyclerView to a specific location in the data source. In addition, the adapter handles the layout of the contents within each individual item view and creates the view holder for each view. The adapter also reports item-click events that are detected by the item view.RecyclerView.ViewHolder– Caches references to the views in your item layout file so that resource lookups are not repeated unnecessarily. The view holder also arranges for item-click events to be forwarded to the adapter when a user taps the view-holder’s associated item view.RecyclerView.LayoutManager– Positions items within the RecyclerView. You can use one of several predefined layout managers or you can implement your own custom layout manager. RecyclerView delegates the layout policy to the layout manager, so you can plug in a different layout manager without having to make significant changes to your app.
Also, you can optionally extend the following classes to change the look and feel of RecyclerView in your app:
RecyclerView.ItemDecorationRecyclerView.ItemAnimator
If you do not extend ItemDecoration and ItemAnimator, RecyclerView uses default implementations. This guide does not explain how to create customItemDecoration and ItemAnimator classes; for more information about these classes, see RecyclerView.ItemDecoration and RecyclerView.ItemAnimator.
How View Recycling Works
RecyclerView does not allocate an item view for every item in your data source. Instead, it allocates only the number of item views that fit on the screen and it reuses those item layouts as the user scrolls. When the view first scrolls out of sight, it goes through the recycling process illustrated in the following figure:

- When a view scrolls out of sight and is no longer displayed, it becomes a scrap view.
- The scrap view is placed in a pool and becomes a recycle view. This pool is a cache of views that display the same type of data.
- When a new item is to be displayed, a view is taken from the recycle pool for reuse. Because this view must be re-bound by the adapter before being displayed, it is called a dirty view.
- The dirty view is recycled: the adapter locates the data for the next item to be displayed and copies this data to the views for this item. References for these views are retrieved from the view holder associated with the recycled view.
- The recycled view is added to the list of items in the RecyclerView that are about to go on-screen.
- The recycled view goes on-screen as the user scrolls the RecyclerViewto the next item in the list. Meanwhile, another view scrolls out of sight and is recycled according to the above steps.
In addition to item-view reuse, RecyclerView also uses another efficiency optimization: view holders. A view holder is a simple class that caches view references. Each time the adapter inflates an item-layout file, it also creates a corresponding view holder. The view holder uses FindViewById to get references to the views inside the inflated item-layout file. These references are used to load new data into the views every time the layout is recycled to show new data.
A Basic RecyclerView Example
In the following code examples, we’ll look at the implementation of theRecyclerViewer sample app to understand how RecyclerView works in a real application. We’ll examine the adapter and view holder implementations to see how they support RecyclerView. In addition, we’ll see how to specify the layout manager, and we’ll modify the app to use a different layout manager.
An Example Data Source
In this example, we use a “photo album” data source (represented by thePhotoAlbum class) to supply RecyclerView with item content. PhotoAlbum is a collection of photos with captions; when you instantiate it, you get a ready-made collection of 32 photos:
PhotoAlbum mPhotoAlbum = new PhotoAlbum();Each photo instance in PhotoAlbum exposes properties that allow you to read its image resource ID, PhotoID, and its caption string, Caption. The collection of photos is organized such that each photo can be accessed by an indexer. For example, the following lines of code access the image resource ID and caption for the tenth photo in the collection:
int imageId = mPhotoAlbum[9].ImageId;
string caption = mPhotoAlbum[9].Caption;
PhotoAlbum also provides a RandomSwap method that you can call to swap the first photo in the collection with a randomly-chosen photo elsewhere in the collection:
mPhotoAlbum.RandomSwap();Because the implementation details of PhotoAlbum are not relevant to understanding RecyclerView, the PhotoAlbum source code is not presented here. The source code to PhotoAlbum is available in the file PhotoAlbum.cs in the RecyclerViewer sample app.
Initialization
Before we implement the layout manager, view holder, and adapter, we need some preliminary code to initialize the application. The layout file,Main.axml, consists of a single RecyclerView within a LinearLayout:
<?xml version="1.0" encoding="utf-8"?>
<LinearLayout xmlns:android="http://schemas.android.com/apk/res/android"
    android:orientation="vertical"
    android:layout_width="fill_parent"
    android:layout_height="fill_parent">
    <android.support.v7.widget.RecyclerView
        android:id="@+id/recyclerView"
        android:scrollbars="vertical"
        android:layout_width="fill_parent"
        android:layout_height="fill_parent" />
</LinearLayout>
Note that you must use the fully-qualified name,android.support.v7.widget.RecyclerView, because RecyclerView is packaged in a support library. The OnCreate method of our MainActivitymust initialize this layout, instantiate the adapter, and prepare the underlying data source:
public class MainActivity : Activity
{
    RecyclerView mRecyclerView;
    RecyclerView.LayoutManager mLayoutManager;
    PhotoAlbumAdapter mAdapter;
    PhotoAlbum mPhotoAlbum;

    protected override void OnCreate (Bundle bundle)
    {
        base.OnCreate (bundle);

        // Prepare the data source:
        mPhotoAlbum = new PhotoAlbum();

        // Instantiate the adapter and pass in its data source:
        mAdapter = new PhotoAlbumAdapter (mPhotoAlbum);

        // Set our view from the "main" layout resource:
        SetContentView (Resource.Layout.Main);

        // Get our RecyclerView layout:
        mRecyclerView = FindViewById<RecyclerView> (Resource.Id.recyclerView);

        // Plug the adapter into the RecyclerView:
        mRecyclerView.SetAdapter (mAdapter);
This code instantiates the PhotoAlbum data source and passes it to our adapter, PhotoAlbumAdapter (which is defined later in this guide). Note that it is considered a best practice to pass the data source as a parameter to the constructor of the adapter. To plug our adapter into the RecyclerViewinstance, we call the RecyclerView SetAdapter method as shown above.
The Layout Manager
The layout manager is responsible for positioning items in the RecyclerViewdisplay; it determines the presentation type (a list or a grid), the orientation (whether items are displayed vertically or horizontally), and which direction items should be displayed (in normal order or in reverse order). The layout manager is also responsible for calculating the size and position of each item in the RecycleView display.
The layout manager has an additional purpose: it determines the policy for when to recycle item views that are no longer visible to the user. Because the layout manager is aware of which views are visible (and which are not), it is in the best position to decide when a view can be recycled. To recycle a view, the layout manager typically makes calls to the adapter to replace the contents of a recycled view with different data, as described previously inHow View Recycling Works.
We can extend RecyclerView.LayoutManager to create our own layout manager, or we can use a predefined layout manager. RecyclerViewprovides the following predefined layout managers:
LinearLayoutManager– Arranges items in a column that can be scrolled vertically, or in a row that can be scrolled horizontally.GridLayoutManager– Displays items in a grid.StaggeredGridLayoutManager– Displays items in a staggered grid, where some items have different heights and widths.
To specify the layout manager, we instantiate our chosen layout manager and pass it to the SetLayoutManager method as shown in the next code example. Note that we must specify the layout manager – RecyclerViewdoes not select a predefined layout manager by default. The following snippet is an example of how to instantiate the LinearLayoutManager and plug it into the RecyclerView instance:
mLayoutManager = new LinearLayoutManager (this);
mRecyclerView.SetLayoutManager (mLayoutManager);
This code resides in the main activity’s OnCreate method. The constructor to the layout manager requires a context; typically, you supply the entireMainActivity by passing this as shown.
In the example photo-viewing app, the predefind LinearLayoutManager is used to lay out each CardView in a vertical scrolling arrangement. Alternatively, we could plug in a custom layout manager that displays twoCardView items side-by-side, implementing a page-turning animation effect to traverse through the collection of photos. Later in this guide, we’ll provide an example of how to modify the layout by swapping in a different layout manager.
For more information about the layout manager, see theRecyclerView.LayoutManager class reference.
The View Holder
The view holder is a class that we define for caching our view references. The adapter uses these view references to bind each view to its content. Every item in the RecyclerView has an associated view holder instance that caches the view references for that item. To create a view holder, we use the following steps to define a class to hold our exact set of views per item:
- Subclass
RecyclerView.ViewHolder. - Implement a constructor that looks up and stores the view references.
- Implement properties that the adapter can use to access these references.
For example, in the RecyclerViewer sample app, the view holder class is called PhotoViewHolder. Each PhotoViewHolder instance holds references to the ImageView and TextView of an associated row item, which is laid out in aCardView as diagrammed here:

PhotoViewHolder derives from RecyclerView.ViewHolder and contains properties to store references to the ImageView and TextView shown in the above layout. PhotoViewHolder consists of two properties and one constructor:
public class PhotoViewHolder : RecyclerView.ViewHolder
{
    public ImageView Image { get; private set; }
    public TextView Caption { get; private set; }

    public PhotoViewHolder (View itemView) : base (itemView)
    {
        // Locate and cache view references:
        Image = itemView.FindViewById<ImageView> (Resource.Id.imageView);
        Caption = itemView.FindViewById<TextView> (Resource.Id.textView);
    }
}
In this code example, the PhotoViewHolder constructor is passed a reference to the parent item view (the CardView) that PhotoViewHolder wraps. Note that we always forward the parent item view to the base constructor. ThePhotoViewHolder constructor calls FindViewById on the parent item view to locate each of its child view references, ImageView and TextView, storing the results in the Image and Caption properties, respectively. The adapter later retrieves view references from these properties when it updates thisCardView‘s child views with new data.
For more information about RecyclerView.ViewHolder, see theRecyclerView.ViewHolder class reference.
The Adapter
Most of the “heavy-lifting” of our RecyclerView integration code takes place in the adapter. RecyclerView requires that we provide an adapter derived from RecyclerView.Adapter to access our data source and populate each item with content from the data source. Because the data source is app-specific, we must implement adapter functionality that understands how to access our data. The adapter extracts information from the data source and loads it into each item in the RecyclerView collection.
The following drawing illustrates how the sample app adapter maps content in the data source (the photo album) through view holders to individual views within each CardView row item in the RecyclerView:

In the example photo-viewing app, the adapter loads each RecyclerViewrow with data for a particular photograph. For a given photograph at row position P, for example, the adapter locates the associated data at position Pwithin the data source and copies this data to the row item at position P in the RecyclerView collection. The adapter uses the view holder to lookup the references for the ImageView and TextView at that position so it doesn’t have to repeatedly call FindViewById for those views as the user scrolls through the photograph collection and reuses views.
In the example photo-viewer app, we derive from RecyclerView.Adapter to create PhotoAlbumAdapter:
public class PhotoAlbumAdapter : RecyclerView.Adapter
{
    public PhotoAlbum mPhotoAlbum;

    public PhotoAlbumAdapter (PhotoAlbum photoAlbum)
    {
        mPhotoAlbum = photoAlbum;
    }
    ...
}
The mPhotoAlbum member contains the data source (the photo album) that is passed into the constructor; the constructor copies the photo album into this member variable. Next, we must override the followingRecyclerView.Adapter methods:
OnCreateViewHolder– Instantiates the item layout file and view holder.OnBindViewHolder– Loads the data at the specified position into the views whose references are stored in the given view holder.ItemCount– Returns the number of items in the data source.
The layout manager calls these methods while it is positioning items within the RecyclerView. In the next few sections, we’ll look at the actual implementation of these methods in the example photo-viewing app.
OnCreateViewHolder
The layout manager calls OnCreateViewHolder when the RecyclerView needs a new view holder to represent an item. OnCreateViewHolder inflates the item view from the view’s layout file and wraps the view in a newPhotoViewHolder instance. The PhotoViewHolder constructor locates and stores references to child views in the layout as described previously in The View Holder.
In the example photo-viewing app, each row item is represented by aCardView that contains an ImageView (for the photo) and a TextView (for the caption). This layout resides in the file PhotoCardView.axml:
<?xml version="1.0" encoding="utf-8"?>
<FrameLayout xmlns:card_view="http://schemas.android.com/apk/res-auto"
    xmlns:android="http://schemas.android.com/apk/res/android"
    android:layout_width="fill_parent"
    android:layout_height="wrap_content">
    <android.support.v7.widget.CardView
        android:layout_width="match_parent"
        android:layout_height="wrap_content"
        card_view:cardElevation="4dp"
        card_view:cardUseCompatPadding="true"
        card_view:cardCornerRadius="5dp">
        <LinearLayout
            android:layout_width="match_parent"
            android:layout_height="wrap_content"
            android:orientation="vertical"
            android:padding="8dp">
            <ImageView
                android:layout_width="match_parent"
                android:layout_height="wrap_content"
                android:id="@+id/imageView"
                android:scaleType="centerCrop" />
            <TextView
                android:layout_width="match_parent"
                android:layout_height="wrap_content"
                android:textAppearance="?android:attr/textAppearanceMedium"
                android:textColor="#333333"
                android:text="Caption"
                android:id="@+id/textView"
                android:layout_gravity="center_horizontal"
                android:layout_marginLeft="4dp" />
        </LinearLayout>
    </android.support.v7.widget.CardView>
</FrameLayout>
This layout represents a single row item in the RecyclerView.OnBindViewHolder (described below) copies data from the data source into the ImageView and TextView of this layout. OnCreateViewHolder inflates this layout for a given photo location in the RecyclerView and instantiates a newPhotoViewHolder instance (which locates and caches references to theImageView and TextView child views in the associated CardView layout):
public override RecyclerView.ViewHolder
    OnCreateViewHolder (ViewGroup parent, int viewType)
{
    // Inflate the CardView for the photo:
    View itemView = LayoutInflater.From (parent.Context).
                Inflate (Resource.Layout.PhotoCardView, parent, false);

    // Create a ViewHolder to hold view references inside the CardView:
    PhotoViewHolder vh = new PhotoViewHolder (itemView);
    return vh;
}
The resulting view holder instance, vh, is returned back to the caller (the layout manager).
OnBindViewHolder
When the layout manager is ready to display a particular view in theRecyclerView‘s visible screen area, it calls the adapter’s OnBindViewHoldermethod to fill the item at the specified row position with content from the data source. In the photo-viewing app, OnBindViewHolder gets the photo information for the specified row position (the photo’s image resource and the string for the photo’s caption) and copies this data to the associated views. Views are located via references stored in the view holder object (which is passed in through the holder parameter):
public override void
    OnBindViewHolder (RecyclerView.ViewHolder holder, int position)
{
    PhotoViewHolder vh = holder as PhotoViewHolder;

    // Load the photo image resource from the photo album:
    vh.Image.SetImageResource (mPhotoAlbum[position].PhotoID);

    // Load the photo caption from the photo album:
    vh.Caption.Text = mPhotoAlbum[position].Caption;
}
The passed-in view holder object must first be cast into the derived view holder type (in this case, PhotoViewHolder) before it is used. The adapter loads the image resource into the view referenced by the view holder’sImage property, and it copies the caption text into the view referenced by the view holder’s Caption property. This binds the associated view with its data.
Notice that OnBindViewHolder is the code that deals directly with the structure of the data. In this case, OnBindViewHolder understands how to map the RecyclerView item position to its associated data item in the data source. The mapping is trivial in this case because the position can be used as an array index into the photo album; however, more complex data sources may require extra code to establish such a mapping.
ItemCount
The ItemCount method returns the number of items in the data collection. In the example photo viewer app, the item count is the number of photos in the photo album:
public override int ItemCount
{
    get { return mPhotoAlbum.NumPhotos; }
}
For more information about RecyclerView.Adapter, see theRecyclerView.Adapter class reference.
Putting it All Together
The resulting RecyclerView implementation for the example photo app consists of MainActivity initialization code, the view holder, and the adapter. MainActivity creates the mRecyclerView instance, instantiates the data source and the adapter, and plugs in the layout manager and adapter:
public class MainActivity : Activity
{
    RecyclerView mRecyclerView;
    RecyclerView.LayoutManager mLayoutManager;
    PhotoAlbumAdapter mAdapter;
    PhotoAlbum mPhotoAlbum;

    protected override void OnCreate (Bundle bundle)
    {
        base.OnCreate (bundle);
        mPhotoAlbum = new PhotoAlbum();
        SetContentView (Resource.Layout.Main);
        mRecyclerView = FindViewById<RecyclerView> (Resource.Id.recyclerView);

        // Plug in the linear layout manager:
        mLayoutManager = new LinearLayoutManager (this);
        mRecyclerView.SetLayoutManager (mLayoutManager);

        // Plug in my adapter:
        mAdapter = new PhotoAlbumAdapter (mPhotoAlbum);
        mRecyclerView.SetAdapter (mAdapter);
    }
}
PhotoViewHolder locates and caches the view references:
public class PhotoViewHolder : RecyclerView.ViewHolder
{
    public ImageView Image { get; private set; }
    public TextView Caption { get; private set; }

    public PhotoViewHolder (View itemView) : base (itemView)
    {
        // Locate and cache view references:
        Image = itemView.FindViewById<ImageView> (Resource.Id.imageView);
        Caption = itemView.FindViewById<TextView> (Resource.Id.textView);
    }
}
PhotoAlbumAdapter implements the three required method overrides:
public class PhotoAlbumAdapter : RecyclerView.Adapter
{
    public PhotoAlbum mPhotoAlbum;
    public PhotoAlbumAdapter (PhotoAlbum photoAlbum)
    {
        mPhotoAlbum = photoAlbum;
    }

    public override RecyclerView.ViewHolder
        OnCreateViewHolder (ViewGroup parent, int viewType)
    {
        View itemView = LayoutInflater.From (parent.Context).
                    Inflate (Resource.Layout.PhotoCardView, parent, false);
        PhotoViewHolder vh = new PhotoViewHolder (itemView);
        return vh;
    }

    public override void
        OnBindViewHolder (RecyclerView.ViewHolder holder, int position)
    {
        PhotoViewHolder vh = holder as PhotoViewHolder;
        vh.Image.SetImageResource (mPhotoAlbum[position].PhotoID);
        vh.Caption.Text = mPhotoAlbum[position].Caption;
    }

    public override int ItemCount
    {
        get { return mPhotoAlbum.NumPhotos; }
    }
}
When this code is compiled and run, it creates the basic photo viewing app as shown in the following screenshots:

This basic app does not respond to item-touch events, nor does it handle changes in the underlying data. Later in this guide, we’ll add this functionality to the sample app.
Changing the LayoutManager
Because of RecyclerView‘s flexibility, it’s easy to modify the app to use a different layout manager. In this example, we’ll modify it to display with a grid layout that scrolls horizontally rather than with a vertical linear layout. To do this, we modify the layout manager instantiation to use theGridLayoutManager as follows:
mLayoutManager = new GridLayoutManager(this, 2, GridLayoutManager.Horizontal, false);This code change replaces the vertical LinearLayoutManager with aGridLayoutManager that presents a grid made up of two rows that scroll in the horizontal direction. When we compile and run the app again, we see that the photographs are displayed in a grid and that scrolling is horizontal rather than vertical:

By changing only one line of code, we were able to modify the photo-viewing app to use a different layout with different behavior. Notice that neither the adapter code nor the layout XML had to be modified in order to change the layout policy.
Extending the Basic Example
The basic example described in the previous sections actually doesn’t do much – it simply scrolls and displays a fixed list of photograph items. In real-world applications, users expect to be able to interact with the app by tapping on items in the display. Also, the underlying data source often changes (or is changed by the app), and the contents of the display must be consistent with these changes. In the following sections, we’ll learn how to handle item-click events and update RecyclerView when the underlying data source changes.
Handling Item-Click Events
When a user touches an item in the RecyclerView, an item-click event is generated to notify our app as to which item was touched. This event is not generated by RecyclerView – instead, the item view (which is wrapped in the view holder) detects touches and reports these touches as click events.
To illustrate how to handle item-click events, we’ll modify the sample photo-viewing app to report which photograph had been touched by the user. When an item-click event occurs in the sample app, the following sequence takes place:
- The photograph’s CardView detects the item-click event and notifies the adapter.
- The adapter forwards the event (with item position information) to the activity’s item-click handler.
- The activity’s item-click handler responds to the item-click event.
First, let’s add an event handler member called ItemClick to ourPhotoAlbumAdapter class definition:
public event EventHandler<int> ItemClick;Next, we’ll create an item-click event handler method in our MainActivity. This handler briefly displays a toast that indicates which photograph item was touched:
void OnItemClick (object sender, int position)
{
    int photoNum = position + 1;
    Toast.MakeText(this, "This is photo number " + photoNum, ToastLength.Short).Show();
}
Next, let’s add a line of code to register our OnItemClick handler withPhotoAlbumAdapter. A good place to do this is immediately afterPhotoAlbumAdapter is created (in the main activity’s OnCreate method):
mAdapter = new PhotoAlbumAdapter (mPhotoAlbum);
mAdapter.ItemClick += OnItemClick;
PhotoAlbumAdapter will now call OnItemClick when it receives an item-click event. Next, let’s create a handler in the adapter that raises this ItemClickevent. We’ll add the following method, OnClick, immediately after the adapter’s ItemCount method:
void OnClick (int position)
{
    if (ItemClick != null)
        ItemClick (this, position);
}
This OnClick method is the adapter’s listener for item-click events from item views. Before we can register this listener with an item view (via the item view’s view holder), we have to modify the PhotoViewHolder constructor to accept this method as an additional argument, and register OnClick with the item view Click event. Here’s the modified PhotoViewHolder constructor:
public PhotoViewHolder (View itemView, Action<int> listener)
    : base (itemView)
{
    Image = itemView.FindViewById<ImageView> (Resource.Id.imageView);
    Caption = itemView.FindViewById<TextView> (Resource.Id.textView);

    itemView.Click += (sender, e) => listener (base.Position);
}
The itemView parameter contains a reference to the CardView that was touched by the user. Note that the view holder base class knows the position of the item (CardView) that it represents (via the Positionproperty), and this position is passed to the adapter’s OnClick method when an item-click event takes place. Let’s modify the adapter’sOnCreateViewHolder method to pass the adapter’s OnClick method to the view-holder’s constructor:
PhotoViewHolder vh = new PhotoViewHolder (itemView, OnClick);Now when we build and run the sample photo-viewing app, tapping a photo in the display will cause a toast to appear that reports which photograph was touched:

This example demonstrates just one approach for implementing event handlers with RecyclerView. Another approach that could be used here is to place events on the view holder and have the adapter subscribe to these events. If the sample photo app provided a photo editing capability, separate events would be required for the ImageView and the TextViewwithin each CardView: touches on the TextView would launch an EditViewdialog that lets the user edit the caption, and touches on the ImageViewwould launch a photo touchup tool that lets the user crop or rotate the photo. Depending on the needs of your app, you must design the best approach for handling and responding to touch events.
Notifying RecyclerView of Data Changes
RecyclerView does not automatically update its display when the contents of its data source changes; the adapter must notify RecyclerView when there is a change in the data set. The data set can change in many ways; for example, the contents within an item can change or the overall structure of the data may be altered. RecyclerView.Adapter provides a number of methods that you can call so that RecyclerView responds to data changes in the most efficient manner:
NotifyItemChanged– Signals that the item at the specified position has changed.NotifyItemRangeChanged– Signals that the items in the specified range of positions have changed.NotifyItemInserted– Signals that the item in the specified position has been newly inserted.NotifyItemRangeInserted– Signals that the items in the specified range of positions have been newly inserted.NotifyItemRemoved– Signals that the item in the specified position has been removed.NotifyItemRangeRemoved– Signals that the items in the specified range of positions have been removed.NotifyDataSetChanged– Signals that the data set has changed (forces a full update).
If you know exactly how your data set has changed, you can call the appropriate methods above to refresh RecyclerView in the most efficient manner. If you do not know exactly how your data set has changed, you can call NotifyDataSetChanged, which is far less efficient because RecyclerViewmust refresh all the views that are visible to the user. For more information about these methods, see RecyclerView.Adapter.
To demonstrate how RecyclerView can be updated when the data set changes, we’ll modify the sample photo-viewing app to randomly pick a photo in the data source and swap it with the first photo. First, let’s add aRandom Pick button to the example photo app’s Main.axml layout:
<?xml version="1.0" encoding="utf-8"?>
<LinearLayout xmlns:android="http://schemas.android.com/apk/res/android"
    android:orientation="vertical"
    android:layout_width="fill_parent"
    android:layout_height="fill_parent">
    <Button
        android:id="@+id/randPickButton"
        android:layout_width="fill_parent"
        android:layout_height="wrap_content"
        android:gravity="center_horizontal"
        android:textAppearance="?android:attr/textAppearanceLarge"
        android:text="Random Pick" />
    <android.support.v7.widget.RecyclerView
        android:id="@+id/recyclerView"
        android:scrollbars="vertical"
        android:layout_width="fill_parent"
        android:layout_height="fill_parent" />
</LinearLayout>
Next, let’s add code at the end of the main activity’s OnCreate method to locate the Random Pick button in the layout and attach a handler to it:
Button randomPickBtn = FindViewById<Button>(Resource.Id.randPickButton);

randomPickBtn.Click += delegate
{
    if (mPhotoAlbum != null)
    {
        // Randomly swap a photo with the first photo:
        int idx = mPhotoAlbum.RandomSwap();
    }
};
This handler calls the photo album’s RandomSwap method when the Random Pick button is tapped. The RandomSwap method randomly swaps a photo with the first photo in the data source, then returns the index of the randomly-swapped photo. When we compile and run the sample app with this code, tapping the Random Pick button does not result in a display change because the RecyclerView is not aware of the change to the data source.
To keep RecyclerView updated after the data source changes, we must modify the Random Pick click handler to call the adapter’sNotifyItemChanged method for each item in the collection that has changed (in this case, two items have changed: the first photo and the swapped photo). This causes RecyclerView to update its display so that it is consistent with the new state of the data source:
Button randomPickBtn = FindViewById<Button>(Resource.Id.randPickButton);

randomPickBtn.Click += delegate
{
    if (mPhotoAlbum != null)
    {
        int idx = mPhotoAlbum.RandomSwap();

        // First photo has changed:
        mAdapter.NotifyItemChanged(0);

        // Swapped photo has changed:
        mAdapter.NotifyItemChanged(idx);
    }
};
Now, when the Random Pick button is tapped, RecyclerView updates the display to show that a photo further down in the collection has been swapped with the first photo in the collection:

Of course, we could call NotifyDataSetChanged instead of making the two calls to NotifyItemChanged, but doing so would force RecyclerView to refresh the entire collection even though only two items in the collection had changed. Calling NotifyItemChanged is significantly more efficient than calling NotifyDataSetChanged.
Summary
This guide introduced the Android RecyclerView widget; it explained how to add the RecyclerView support library to Xamarin.Android projects, howRecyclerView recycles views, how it enforces the view-holder pattern for efficiency, and how the various helper classes that make up RecyclerViewcollaborate to display collections. It provided example code to demonstrate how RecyclerView is integrated into an application, it demonstrated how to tailor RecyclerView‘s layout policy by plugging in different layout managers, and it explained how to handle item click events and notify RecyclerView of data source changes.
For more information about RecyclerView, see the RecyclerView class reference.
Performance Tips for Android’s ListView
I’ve been messing around with Android-based code for a few months now while hacking on Native Firefox for Android and Pattrn. I noticed that the performance tips for ListViews are a bit scattered in different sources. This post is an attempt to summarize the ones I found most useful.
I’m assuming you’re already familiar with ListViews and understand the framework around AdapterViews. I’ve added some Android source code pointers for the curious readers willing to understand things a bit deeper.
How it works
ListView is designed for scalability and performance. In practice, this essentially means:
- It tries to do as few view inflations as possible.
- It only paints and lays out children that are (or are about to become) visible on screencode.
The reason for 1 is simple: layout inflations are expensive operationscode. Although layout files are compiled into binary form for more efficient parsingcode, inflations still involve going through a tree of special XML blockscode and instantiating all respective views. ListView solves this problem by recyclingcode non-visible views—called “ScrapViews” in Android’s source code—as you pan around. This means that developers can simply update the contents of recycled viewscode instead of inflating the layout of every single row—more on that later.
In order to implement 2, ListView uses the view recycler to keep adding recycled views below or above the current viewport and moving active views to a recyclable pool as they move off-screencode while scrolling. This wayListView only needs to keep enough views in memory to fill its allocated space in the layout and some additional recyclable views—even when your adapter has hundreds of items. It will fill the space with rows in different ways—from top, from bottom, etc—depending on how the viewport changedcode. The image below visually summarizes what happens when you pan a ListViewdown.

With this framework in mind, let’s move on to the tips. As you’ve seen above,ListView dynamically inflates and recycles tons of views when scrolling so it’s key to make your adapter’s getView() as lightweight as possible. All tips resolve around making getView() faster in one way or another.
View recycling
Every time ListView needs to show a new row on screen, it will call thegetView() method from its adapter. As you know, getView() takes three arguments arguments: the row position, a convertView, and the parentViewGroup.
The convertView argument is essentially a “ScrapView” as described earlier. It will have a non-null value when ListView is asking you recycle the row layout. So, when convertView is not null, you should simply update its contents instead of inflating a new row layout. The getView() code in your adapter would look a bit like:
public View getView(int position, View convertView, ViewGroup parent) {
    if (convertView == null) {
        convertView = mInflater.inflate(R.layout.your_layout, null);
    }

    TextView text = (TextView) convertView.findViewById(R.id.text);
    text.setText("Position " + position);

    return convertView;
}
View Holder pattern
Finding an inner view inside an inflated layout is among the most common operations in Android. This is usually done through a View method calledfindViewById(). This method will recursively go through the view tree looking for a child with a given IDcode. Using findViewById() on static UI layouts is totally fine but, as you’ve seen, ListView calls the adapter’s getView() very frequently when scrolling. findViewById() might perceivably hit scrolling performance in ListViews—especially if your row layout is non-trivial.
The View Holder pattern is about reducing the number of findViewById() calls in the adapter’s getView(). In practice, the View Holder is a lightweight inner class that holds direct references to all inner views from a row. You store it as a tag in the row’s view after inflating it. This way you’ll only have to usefindViewById() when you first create the layout. Here’s the previous code sample with View Holder pattern applied:
public View getView(int position, View convertView, ViewGroup parent) {
    ViewHolder holder;

    if (convertView == null) {
        convertView = mInflater.inflate(R.layout.your_layout, null);

        holder = new ViewHolder();
        holder.text = (TextView) convertView.findViewById(R.id.text);

        convertView.setTag(holder);
    } else {
        holder = convertView.getTag();
    }

    holder.text.setText("Position " + position);

    return convertView;
}

private static class ViewHolder {
    public TextView text;
}
Async loading
Very often Android apps show richer content in each ListView row such as images. Using drawable resources in your adapter’s getView() is usually fine as Android caches those internallycode. But you might want to show more dynamic content—coming from local disk or internet—such as thumbnails, profile pictures, etc. In that case, you probably don’t want to load them directly in your adapter’s getView() because, well, you should never ever block UI thread with IO. Doing so means that scrolling your ListView would look anything but smooth.
What you want to do is running all per-row IO or any heavy CPU-bound routine asynchronously in a separate thread. The trick here is to do that and still comply with ListView‘s recycling behaviour. For instance, if you run anAsyncTask to load a profile picture in the adapter’s getView(), the view you’re loading the image for might be recycled for another position before theAsyncTask finishes. So, you need a mechanism to know if the view hasn’t been recycled once you’re done with the async operation.
One simple way to achieve this is to attach some piece of information to the view that identifies which row is associated with it. Then you can check if the target row for the view is still the same when the async operation finishes. There are many ways of achieving this. Here is just a simplistic sketch of one way you could do it:
public View getView(int position, View convertView,
        ViewGroup parent) {
    ViewHolder holder;

    ...

    holder.position = position;

    new ThumbnailTask(position, holder)
            .executeOnExecutor(AsyncTask.THREAD_POOL_EXECUTOR, null);

    return convertView;
}

private static class ThumbnailTask extends AsyncTask {
    private int mPosition;
    private ViewHolder mHolder;

    public ThumbnailTask(int position, ViewHolder holder) {
        mPosition = position;
        mHolder = holder;
    }

    @Override
    protected Cursor doInBackground(Void... arg0) {
        // Download bitmap here
    }

    @Override
    protected void onPostExecute(Bitmap bitmap) {
        if (mHolder.position == mPosition) {
            mHolder.thumbnail.setImageBitmap(bitmap);
        }
    }
}

private static class ViewHolder {
    public ImageView thumbnail;
    public int position;
}
Interaction awareness
Asynchronously loading heavier assets for each row is an important step to towards a performant ListView. But if you blindly start an asynchronous operation on every getView() call while scrolling, you’d be wasting a lot of resources as most of the results would be discarded due to rows being recycled very often.
We need to add interaction awareness to your ListView adapter so that it doesn’t trigger any asynchronous operation per row after, say, a fling gesture on the ListView—which means that the scrolling is so fast that it doesn’t make sense to even start any asynchronous operation. Once scrolling stops, or is about to stop, is when you want to start actually showing the heavy content for each row.
I won’t post a code sample for this—as it involves too much code to post here—but the classic Shelves app by Romain Guy has a pretty good example. It basically triggers the async book cover loading once the GridView stops scrolling among other things. You can also balance interaction awareness with an in-memory cache so that you show cached content even while scrolling. You got the idea.
A First Glance at Android’s RecyclerView
At this year’s Google I/O, Google released a preview to the upcoming Android version. The so called L Developer Preview. This is a very big improvement over previous releases and I really love that Google is doing this. I think we all benefit by this decision. As developers and as consumers alike!
Part of this preview are two new views: RecyclerView and CardView. This post gives you an introduction to the RecyclerView, it’s many internal classes and interfaces, how they interact and how you can use them.
Let me start with the good news: RecyclerView is part of the support library. So you can use it right now. Ok: You can use it as soon as the final support lib accompanying the L release gets released. So better to familiarize yourself with it right away ![]()
Sample project
The screenshots and the video at the end of the post show the sample project for this post in action. You can find the source of this sample at github. Keep in mind that the RecyclerView API is not yet finalized. Google might still change things that could break the sample when they release the final version of Android L.
What’s with this odd name? Why RecyclerView?
This is how Google describes RecyclerView in the API documentation of the L preview release:
A flexible view for providing a limited window into a large data set.
So RecyclerView is the appropriate view to use when you have multiple items of the same type and it’s very likely that your user’s device cannot present all of those items at once. Possible examples are contacts, customers, audio files and so on. The user has to scroll up and down to see more items and that’s when the recycling and reuse comes into play. As soon as a user scrolls a currently visible item out of view, this item’s view can be recycled and reused whenever a new item comes into view.
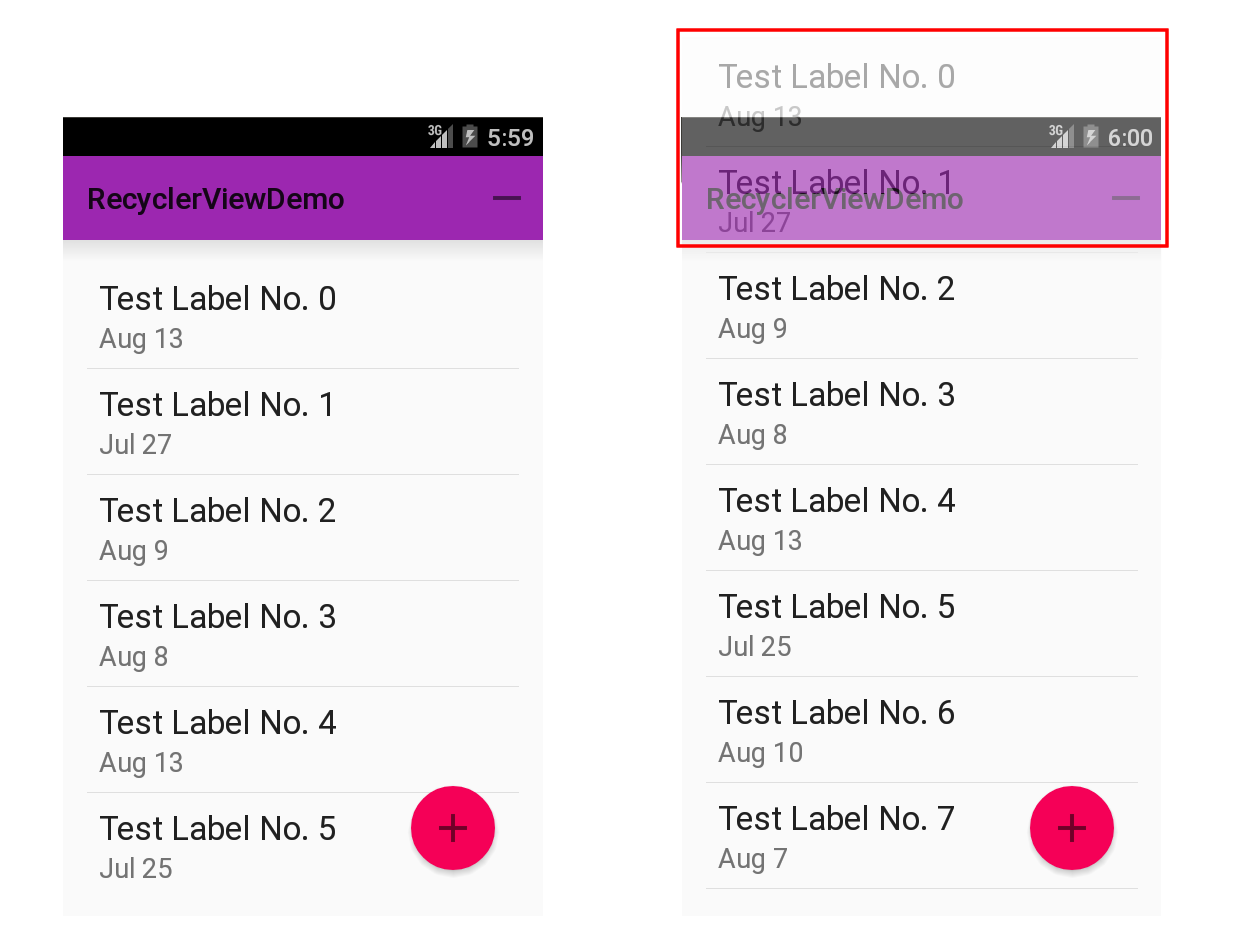
The following screenshots of the sample app illustrate this. On the left is the sample app after the initial start. When you scroll the view up, some views become eligible for recycling. The red area on the right screenshot, for example, highlights two invisible views. The recycler can now put these views into a list of candidates to be reused should a new view be necessary.
Recycling of views is a very useful approach. It saves CPU resources in that you do not have to inflate new views all the time and it saves memory in that it doesn’t keep plenty of invisible views around.
Now, you might say: That’s nothing new. And you’re right! We had that with ListView for a very long time. The concept of recycling views itself it not new. But while you previously had a ListView where the appearance, recycling and everything was tightly coupled, Google now follows a much better, a much more flexible approach with the new RecyclerView. I really like the approach Google has taken here!
RecyclerView doesn’t care about visuals
Here’s the thing: While with Listview we had tight coupling, Google now uses an approach where theRecyclerView itself doesn’t care about visuals at all. It doesn’t care about placing the elements at the right place, it doesn’t care about separating any items and not about the look of each individual item either. To exaggerate a bit: All RecyclerView does, is recycle stuff. Hence the name.
Anything that has to do with layout, drawing and so on, that is anything that has to do with how your data set is presented, is delegated to pluggable classes. That makes the new RecyclerView API extremely flexible. You want another layout? Plug in another LayoutManager. You want different animations? Plug in anItemAnimator. And so on.
Here’s the list of the most important classes that RecyclerView makes use of to present the data. All these classes are inner classes of the RecyclerView:
| Class | Usage |
|---|---|
| Adapter | Wraps the data set and creates views for individual items |
| ViewHolder | Holds all sub views that depend on the current item’s data |
| LayoutManager | Places items within the available area |
| ItemDecoration | Draws decorations around or on top of each item’s view |
| ItemAnimator | Animates items when they are added, removed or reordered |
In the next paragraphs I will briefly describe what each class or interface is about and how RecyclerViewuses it. In future posts I will revisit some of these classes, write about them in detail and show you how to customize them for your project’s needs.
ViewHolder
ViewHolders are basically caches of your View objects. The Android team has been recommending using the ViewHolder pattern for a very long time, but they never actually enforced the use of it. Now with the new Adapter you finally have to use this pattern.
It’s a bit weird that Google waited so long to enforce the usage of the ViewHolder pattern, but better late than never. If you do not know about the ViewHolder pattern, have a look at this Android training session. It uses the old Adapter, but the pattern itself hasn’t changed.
Also searching for ViewHolder should yield plenty of hits to further blog posts. For example this post byAntoine Merle about ListView optimizations.
One thing that is specific to any RecyclerView.ViewHolder subclass is that you can always access the root view of your ViewHolder by accessing the public member itemView. So there’s no need to store that within your ViewHolder subclass.
And should you decide to override toString() have a look at the base class. Its toString() implementation prints some useful information you should consider to use for your log messages as well.
Here’s the code for the ViewHolder of the sample project. The ViewHolder is an inner class of the sample project’s Adapter:
public final static class ListItemViewHolder extends RecyclerView.ViewHolder {
   TextView label;
   TextView dateTime;

   public ListItemViewHolder(View itemView) {
      super(itemView);
      label = (TextView) itemView.findViewById(R.id.txt_label_item);
      dateTime = (TextView) itemView.findViewById(R.id.txt_date_time);
   }
}
RecyclerView.Adapter
Adapters fulfill two roles: They provide access to the underlying data set and they are responsible for creating the correct layout for individual items. Adapters always were part of Android and were used in many places. ListView, AutoCompleteTextView, Spinner and more all made use of adapters. All those classes inherit from AdapterView. But not so RecyclerView.
For the new RecyclerView Google has decided to replace the old Adapter interface with a newRecyclerView.Adapter base class. So say good bye to things like SimpleCursorAdapter, ArrayAdapter and the like. At least in their current incarnation.
Currently there is no default implementation of RecyclerView.Adapter available. Google might add some later on, but I wouldn’t bet on this. For Animations to work properly, cursors and arrays aren’t the best fit, so porting the current Adapter implementations might not make too much sense.
Since RecyclerView.Adapter is abstract you will have to implement these three methods:
public VH onCreateViewHolder(ViewGroup parent, int viewType)public void onBindViewHolder(VH holder, int position)public int getItemCount()
The VH in the method signatures above is the generic type parameter. You specify the concrete type to use when you subclass the RecyclerView.Adapter. You can see this in line 3 of the next code sample.
The most basic adapter for the sample layout looks like this:
public class RecyclerViewDemoAdapter extends
        RecyclerView.Adapter
        <RecyclerViewDemoAdapter.ListItemViewHolder> {

    private List<DemoModel> items;

    RecyclerViewDemoAdapter(List<DemoModel> modelData) {
        if (modelData == null) {
            throw new IllegalArgumentException(
                  "modelData must not be null");
        }
        this.items = modelData;
    }

    @Override
    public ListItemViewHolder onCreateViewHolder(
            ViewGroup viewGroup, int viewType) {
        View itemView = LayoutInflater.
                from(viewGroup.getContext()).
                inflate(R.layout.item_demo_01,
                        viewGroup,
                        false);
        return new ListItemViewHolder(itemView);
    }

    @Override
    public void onBindViewHolder(
            ListItemViewHolder viewHolder, int position) {
        DemoModel model = items.get(position);
        viewHolder.label.setText(model.label);
        String dateStr = DateUtils.formatDateTime(
                viewHolder.label.getContext(),
                model.dateTime.getTime(),
                DateUtils.FORMAT_ABBREV_ALL);
        viewHolder.dateTime.setText(dateStr);
    }

    @Override
    public int getItemCount() {
        return items.size();
    }

    public final static class ListItemViewHolder
           extends RecyclerView.ViewHolder {
        // … shown above in the ViewHolder section
    }
}
RecyclerView.LayoutManager
The LayoutManager is probably the most interesting part of the RecyclerView. This class is responsible for the layout of all child views. There is one default implementation available: LinearLayoutManager which you can use for vertical as well as horizontal lists.
You have to set a LayoutManager for your RecyclerView otherwise you will see an exception at Runtime:
08-01 05:00:00.000  2453  2453 E AndroidRuntime: java.lang.NullPointerException: Attempt to invoke virtual method ‘void android.support.v7.widget.RecyclerView$LayoutManager.onMeasure(android.support.v7.widget.RecyclerView$Recycler, android.support.v7.widget.RecyclerView$State, int, int)’ on a null object reference
08-01 05:00:00.000  2453  2453 E AndroidRuntime: 	at android.support.v7.widget.RecyclerView.onMeasure(RecyclerView.java:1310)
Only one method of LayoutManager is currently abstract:
public LayoutParams generateDefaultLayoutParams()
But there is another one where the code states that you should overrride it since it’s soon going to be abstract:
public void scrollToPosition(int position) {
   if (DEBUG) {
      Log.e(TAG, "You MUST implement scrollToPosition. It will soon become abstract");
   }
}
That’s very weird! Why not make it abstract right away? Anyway: Better you override this one to be on the safe side for when Google releases the final version of L.
But only overriding those two methods won’t get you very far. After all the LayoutManager is responsible for positioning the items you want to display. Thus you have to override onLayoutChildren() as well.
This method also contains a log statement stating “You must override onLayoutChildren(Recycler recycler, State state)”. Ok, then make it abstract ![]() Luckily there’s still plenty (?) of time to change that into a proper abstract method for the final release of L. We all make mistakes. After all, my “Stupid stuff devs make” series is all about blunders that I made. So don’t get me wrong. No hard feelings here!
Luckily there’s still plenty (?) of time to change that into a proper abstract method for the final release of L. We all make mistakes. After all, my “Stupid stuff devs make” series is all about blunders that I made. So don’t get me wrong. No hard feelings here!
LinearlayoutManager
The LinearLayoutManager is currently the only default implementation of LayoutManager. You can use this class to create either vertical or horizontal lists.
The implementation of LinearLayoutManager is rather complex and I only had a look at some key aspects. I will return to this implementation in my post about custom LayoutManagers.
To use the LinearLayoutManager you simply have to instantiate it, tell it which orientation to use and you are done:
LinearLayoutManager layoutManager = new LinearLayoutManager(context);
layoutManager.setOrientation(LinearLayoutManager.VERTICAL);
layoutManager.scrollToPosition(currPos);
recyclerView.setLayoutManager(layoutManager);
LinearLayoutManager also offers some methods to find out about the first and last items currently on screen:
findFirstVisibleItemPosition()findFirstCompletelyVisibleItemPosition()findLastVisibleItemPosition()findLastCompletelyVisibleItemPosition()
Surprisingly these methods are not part of the source code in the SDK folder, but you can use them as they are part of the binaries. As I cannot imagine those being removed, I’m sure you’ll find these in the final L release as well.
Other methods help you get the orientation of the layout or the current scroll state. Others will compute the scroll offset. And finally you can reverse the ordering of the items.
Since I’m going to write an extra post about LayoutManagers this should suffice for now.
RecyclerView.ItemDecoration
With an ItemDecoration you can add an offset to each item and modify the item so that items are separated from each other, highlighted or, well, decorated.
You do not have to use an ItemDecoration. If, for example, you use a CardView for each item, there’s no need for an ItemDecoration.
On the other hand you can add as many ItemDecorations as you like. The RecyclerView simply iterates over all ItemDecorations and calls the respective drawing methods for each of them in the order of the decoration chain.
The abstract base class contains these three methods:
public void onDraw(Canvas c, RecyclerView parent)public void onDrawOver(Canvas c, RecyclerView parent)public void getItemOffsets(Rect outRect, int itemPosition, RecyclerView parent)
Anything you paint in onDraw() might be hidden by the content of the item views but anything that you paint in onDrawOver() is drawn on top of the items. If you simply create a bigger offset and, for example, use this offset to paint dividers, this of course is of no importance. But if you really want to add decorations, you have to use onDrawOver().
The LayoutManager calls the getItemOffset() method during the measurement phase to calculate the correct size of each item’s views. The outRect parameter might look a bit odd at first. Why not use a return value instead? But it really makes a lot of sense, since this allows RecyclerView to reuse one Rect object for all children and thus save resources. Not necessarily nice — but efficient.
One thing I didn’t expect considering the name of the class is that the onDraw()/onDrawOver() methods arenot called for each item, but just once for every draw operation of the RecyclerView. You have to iterate over all child views of the RecyclerView yourself.
I will explain this in more detail in a follow-up post about writing your own ItemDecorations.
RecyclerView.ItemAnimator
The ItemAnimator class helps the RecyclerView with animating individual items. ItemAnimators deal with three events:
- An item gets added to the data set
- An item gets removed from the data set
- An item moves as a result of one or more of the previous two operations
Luckily there exists a default implementation aptly named DefaultItemAnimator. If you do not set a custom ItemAnimator, RecyclerView uses an instance of DefaultItemAnimator.
Obviously for animations to work, Android needs to know about changes to the dataset. For this Android needs the support of your adapter. In earlier versions of Android you would call notifyDataSetChanged()whenever changes occured, this is no longer appropriate. This method triggers a complete redraw of all (visible) children at once without any animation. To see animations you have to use more specific methods.
The RecyclerView.Adapter class contains plenty of notifyXyz() methods. The two most specific are:
public final void notifyItemInserted(int position)public final void notifyItemRemoved(int position)
The following video shows the result of an addition as well as a removal of an item in the sample app:
Video Player
A short video showing the default animations for the removal and addition of elements
Listeners
RecyclerView also offers some rather generic listeners. Once again you can safely forget everything you used to use up to now. There is no OnItemClickListener or OnItemLongClickListener. But you can use anRecyclerView.OnItemTouchListener in combination with gesture detection to identify those events. A bit more work and more code to achieve the same result. I still hope for Google to add those Listeners in the final release. But whether those Listeners will be added is as an open question.
Combining all classes
You combine the classes either in a fragment or an activity. For the sake of simplicity my sample app uses activities only.
First of all here’s the layout file containing the RecyclerView:
<RelativeLayout xmlns:android="http://schemas.android.com/apk/res/android"
    xmlns:tools="http://schemas.android.com/tools"
    android:layout_width="match_parent"
    android:layout_height="match_parent"
    android:paddingLeft="@dimen/activity_horizontal_margin"
    android:paddingRight="@dimen/activity_horizontal_margin"
    android:paddingTop="@dimen/activity_vertical_margin"
    android:paddingBottom="@dimen/activity_vertical_margin"
    tools:context=".RecyclerViewDemoActivity">

    <android.support.v7.widget.RecyclerView
        android:id="@+id/recyclerView"
        android:layout_width="match_parent"
        android:layout_height="match_parent"
        tools:context=".MainActivity"
        tools:listitem="@layout/item_demo_01"
        />

    <ImageButton
        android:id="@+id/fab_add"
        android:layout_alignParentRight="true"
        android:layout_alignParentBottom="true"
        android:layout_width="@dimen/fab_size"
        android:layout_height="@dimen/fab_size"
        android:layout_gravity="bottom|right"
        android:layout_marginRight="16dp"
        android:layout_marginBottom="16dp"
        android:background="@drawable/ripple"
        android:stateListAnimator="@anim/anim"
        android:src="@drawable/ic_action_add"
        android:elevation="1dp"
        />
</RelativeLayout>
As you can see, nothing special here. You do not define the orientation or stuff like that on theRecyclerView. Actually RecyclerView itself makes no use of the attributes, it passes them on to the parent (which is ViewGroup) and that’s it.
There is one place within RecyclerView where an AttributeSet is used and that is in thegenerateLayoutParams() method:
@Override
public ViewGroup.LayoutParams generateLayoutParams(AttributeSet attrs) {
   if (mLayout == null) {
      throw new IllegalStateException("RecyclerView has no LayoutManager");
   }
   return mLayout.generateLayoutParams(getContext(), attrs);
}
In this snippet the RecyclerView passes the AttributeSet on to the LayoutManager.
The Java code is also pretty simple:
setContentView(R.layout.activity_recyclerview_demo);
recyclerView = (RecyclerView) findViewById(R.id.recyclerView);

LinearLayoutManager layoutManager = new LinearLayoutManager(this);
layoutManager.setOrientation(LinearLayoutManager.VERTICAL);
layoutManager.scrollToPosition(0);
recyclerView.setLayoutManager(layoutManager);

// allows for optimizations if all item views are of the same size:
recyclerView.setHasFixedSize(true);

// For the sake of simplicity I misused the Application subclass as a DAO
List<DemoModel> items = RecyclerViewDemoApp.getDemoData();
adapter = new RecyclerViewDemoAdapter(items);
recyclerView.setAdapter(adapter);

RecyclerView.ItemDecoration itemDecoration =
        new DividerItemDecoration(this, DividerItemDecoration.VERTICAL_LIST);
recyclerView.addItemDecoration(itemDecoration);

// this is the default;
// this call is actually only necessary with custom ItemAnimators
recyclerView.setItemAnimator(new DefaultItemAnimator());

// onClickDetection is done in this Activity’s OnItemTouchListener
// with the help of a GestureDetector;
// Tip by Ian Lake on G+ in a comment to this post:
// https://plus.google.com/+LucasRocha/posts/37U8GWtYxDE
recyclerView.addOnItemTouchListener(this);
gesturedetector =
        new GestureDetectorCompat(this, new RecyclerViewDemoOnGestureListener());
Connecting all those elements together roughly consists of these steps:
- Get a reference to your
RecyclerView - Create a
LayoutManagerand add it - Create an
Adapterand add it - Create zero or more
ItemDecorationsas needed and add them - Create an
ItemAnimatorif needed and add it - Create zero or more listeners as needed and add them
All in all about 30 lines of code.
Now of course this is misleading. That’s only the glue code. The really interesting stuff is in RecyclerView'smany inner classes which you can subclass and tweak to your needs. That’s where the real work is done.
But the separation of concerns Google created helps you stick to one task within one implementation and it should make reuse easier to achieve. That’s why I like RecyclerView and its ecosystem. I’m not afraid to criticize big G, but that’s well done, Google!
Gradle integration
To use RecyclerView you have to add it to your gradle file. Adding the support library alone is not enough:
dependencies {
   //…
   compile ‘com.android.support:recyclerview-v7:+’
   //…
}
Is that the final API?
Of course I do not know if the concrete implementations that the preview contains will be in the final release of Android L. But I guess so. And I expect some additions as well as minor changes to the API, based on bug reports and developer feedback.
Google itself gives one hint in the current API documentation about more stuff to come. The documentation for the RecyclerView.LayoutManager class contains this nugget:
Several stock layout managers are provided for general use.
So we can expect more LayoutManagers. Which, of course, is good. Furthermore I expect at least one default ItemDecoration as well. After all the support library’s sample project contains aDividerItemDecoration, which works well with the LinearLayoutManager.
I’m more skeptical about adapters. While an ArrayAdapter (or better yet, ListAdapter) is very well possible, I am more doubtful about a CursorAdapter since cursors do not lend themself easily to the new addition and removal notifications within the Adapter.
Lucas Rocha’s TwoWayView to simplify your life
I strongly recommend to have a look at Lucas Rocha’s TwoWayView project. He has updated his project to work with RecyclerView and has done a great deal to make using RecyclerView a lot easier. For many use cases the default layouts he provides should suffice. And he also provides support for customLayoutManagers. Which are simpler to write using his framework than with the base RecyclerView.
Take a look at his project and check out if it covers all you need. Using it helps you get rid of some ofRecyclerView‘s complexity.
For more information about his project see his blog post about how TwoWayView extends and simplifies RecyclerView.
To learn about news about this project follow Lucas Rocha on Google plus or Twitter.
I will cover TwoWayView in this series as well – so stay tuned ![]()
Android: Re-installation failed due to different application signatures
Frequently we do our work from two different computers, for example at work and at home. You will get this error and ask you to re install your app.
It happens because keystores on your laptop and original pc are different. it’s called debug.keystrore and located in %USER_HOME%/.android/ folder. TO be more specific it happens because eclipse tries to push apk with reinstall key. So you have two options
- Share debug.keystore between various development pc’s
- Manually uninstall your apk from device ( using adb )
Australia Property investment
就算取消负扣税,房价依然不会跌,更不会大跌。
有些泡沫过高的楼花会有价格调整,但是不会比周边二手房价格更便宜,如果新楼开盘售价比周边二手房更便宜,这才是房价会跌的信号。
以下只讨论投资房,自住房无论涨跌都对市场没影响。
1-房产尤其是二手房价格不像股票价格会被大财团大机构控制,房产是分散在民间的资本,房东拥有房产定价权。
2-投资的房产,只要租金能大致相当贷款利息,房东便可长期持有,不可能会低于购入价抛售。
3-即使空租了,只要房东依然有其他收入来支持贷款利息,房东依然不会低价抛售。
4-如果持有多套投资房,都出租不掉,也没有其他资金来源,必须卖房,房东最惨也就是原价卖出。
5-如果无法原价卖出,房东会选择违约让银行收走。(100万的房子贷款80万,最后60万卖掉,却还欠银行20万,不如把房子还给银行好了)
6-银行贷款要给房屋估价,就是为了防止第5条的情况发生,离谱的房价银行是拒绝贷款的,只要银行能贷款给你,就说明银行对房市依然有信心。
【何时房价会跌】
1-银行收紧投资房贷款,投资房租金不再计入你的还款能力,不再做refinance.
2-租房市场惨淡,大量投资房租不出去,hold不住的房东会贱卖或还给银行,银行会拿出大量违约房产到市场上拍卖。
3-大量房屋出现在市场上,买家可以随意砍价随意挑选货比三家,中介牛皮糖一样把买家当上帝时。
4-买家越来越少,房东降价还是卖不出去,根本没人想来抄底,因为失业率大增,人们纷纷逃离这个城市,没有工作机会要买房干嘛,就像西澳珀斯,曾今的百万豪宅现在打对折,但是你会去买吗,几十万去鬼城买个豪宅,光长草不涨价,根本没人租。
5-公司大量倒闭,银行保险公司倒闭,人员流失严重,成为罪恶之地,像底特律那样,house不要钱,谁占了就是谁的,你去底特律吗?
【房价只会短期调整泡沫】
人人持币观望,希望跌价马上就捡个漏,这种市场情况怎么可能大跌呢。政府干预根本没用,天朝政府如此权力集中,限购加房产税却依然打压不下房价,何况澳洲政府,取消负扣税算根鸡毛啊。
当房价开始暴跌时,就是社会崩溃的时候,房价越是暴跌越没人买,如果100万跌到80万你买吗,万一买了之后跌到60万呢?房子只买涨不买跌,有小部分房 东特殊原因降价给你捡个漏,能hold住的不差钱的干嘛跌价给你捡漏,今年涨势不好就hold到明年卖,或后年卖,总之等下波行情再卖。
所以现在不要去猜房价涨跌,要分析金融,就业状况,社会状况,政局变化,如果经济持续低迷恶化,失业率不断上升,在这样一个地方连饭都吃不饱了,房价跌了又有何意义呢。
悉尼现在情况是受澳洲全国影响,经济相对低迷,但是有些领域混的好的依然年薪十多万,看看周围的朋友是否都面临裁员失业,而且政府很多政策出台都是在努力挽救经济颓势,想尽快逆转,让澳洲走出困境,社会还没绝望,房产自然有信心。
Belowed is the artile translated by Google Translater
Even cancel the negative tax, prices still will not fall, but will not collapse.
Some foam excessively high price adjustment will be uncompleted, but will not be cheaper than the surrounding second-hand house prices, if the opening price of the new building is cheaper than the surrounding second homes, this is a signal that prices will fall.
The following discussion only investment house, regardless of the ups and downs have no effect on the housing market since.
1- real estate, especially second-hand housing prices, unlike the stock price will be controlled by large consortia large organizations, real estate is dispersed in private capital, the landlord owns the property pricing.
2- real estate investment, as long as the rent can be roughly the loan interest, the landlord can be long-term holders, can not be lower than the purchase price to sell.
3- Even empty rent, as long as the landlord still have other income to support the loan interest, the landlord still does not sell cheap.
4- If you hold multiple sets of investment property, rent can not afford to have, there is no other source of funds, must sell, which is the worst landlord sold the original price.
5- If you can not sell the original price, the landlord may choose to let the bank take away breach. (1 million house loan 800 000, 600 000 and finally sold, still owe the bank 200 000, as well the house back to the bank)
6- to give the house a bank loan valuation, is to prevent the occurrence of article 5, outrageous prices banks are refusing loans, as long as the bank can lend to you, it means the bank on the housing market still has confidence.
[When house prices will fall]
1- investment banks to tighten housing loans, investment house rent is no longer included in your repayment ability, do not refinance.
2- rental market is bleak, the rent does not go out a lot of investment, hold the landlord could not be sold at or returned to the bank, the bank will come up with a large number of defaults on real estate market auction.
3- large number of houses on the market, buyers are free to choose to bargain shop around, intermediaries like obstinacy when the buyer when God.
4- fewer buyers, landlords or sell price, no one wanted to buy the dips, because the unemployment rate surge, people have fled the city, why not have jobs to buy a house, like Perth, Western Australia, has Today million mansion now playing on the break, but you will buy it, hundreds of thousands to buy a mansion ghost town, light long grass prices, no one to rent.
5- company going bankrupt, banks insurance company closures, staff turnover serious, become Sodom, like Detroit did, house not money, who accounted for is who you go to Detroit it?
[Foam] prices only short-term adjustment
Everyone hold out hope that the decline in value immediately pick up a leak, how this market could crash it. Government intervention useless, heavenly government so the concentration of power, plus the purchase of real estate tax is still weighed less than the price, not to mention the Australian government, the abolition of negative gearing count root feather ah.
When housing prices began to fall, is the social collapse, when prices plummeted more will buy more, if one million fell 800,000 you buy it, and then fell to 600 000 to buy a case of it? House only buy or not to buy, there is a small part of the landlord to give you a specific reason prices pick up a leak, can hold live Why not bad money to give you Jianlou depreciation, gains this year to sell well on hold until next year, or the year after sell short wait for the next wave of market and then sell.
So now do not guess prices up or down, to analyze the financial, employment status, social status, political changes, if the deterioration of the economic downturn, rising unemployment, in such a place even have enough to eat, and prices fell another what significance does it.
Sydney, Australia, the country is now the case is affected by the relative economic slump, but some areas still good mix of tens of thousands of annual salary, look around friends are unemployed are facing layoffs, and many government policies are trying to save the economy in decline, want to reverse as soon as possible, so that the Australian out of the woods, the community did not despair, real estate naturally confident.
notifyDataSetChanged not working for Array Adapter
For an ArrayAdapter, notifyDataSetChanged only works if you use the add(), insert(), remove(), and clear() on the Adapter.
When an ArrayAdapter is constructed, it holds the reference for the List that was passed in. If you were to pass in a List that was a member of an Activity, and change that Activity member later, the ArrayAdapter is still holding a reference to the original List. The Adapter does not know you changed the List in the Activity.
Your choices are:
- Use the functions of the
ArrayAdapterto modify the underlying List (add(),insert(),remove(),clear(), etc.) - Re-create the
ArrayAdapterwith the newListdata. (Uses a lot of resources and garbage collection.) - Create your own class derived from
BaseAdapterandListAdapterthat allows changing of the underlyingListdata structure. - Use the
notifyDataSetChanged()every time the list is updated. To call it on the UI-Thread, use therunOnUiThread()ofActivity. Then,notifyDataSetChanged()will work.
ViewPager with FragmentPagerAdapter
Spend one hour trying find how to access my list fragment as there was no explicit fragment ID
1. Get current select view page
ViewPager viewPager = (ViewPager) findViewById(R.id.pager);
int id = viewPager.getCurrentItem();
2. Get Fragment by tag
Fragment frag = getFragmentManager().findFragmentByTag(“android:switcher:”+R.id.pager+”:”+id);
Then you can access your fragment reference.
convertView in Android listview
I am sure you must have come face to face with one of Android’s most common composite view – the ListView. And also at some point or the other, you must have felt the need to populate your List with some custom views using your own adapter which must have extended the BaseAdapter , instead of simply using a ListAdapter .
All’s fine till this point, you merrily extend your adapter with the BaseAdapter, implement the unimplemented methods necessary until you see the getView( ) method with three parameters if I remember correctly.
1 2 3 4 |
public View getView(int position, View convertView, ViewGroup parent) {
        //What-to-do here
        return null;
    }
|
Yep, it is three alright. You can comprehend what position is. Parent is the ListView being populated, obviously. But what in the green droid is convertView? Well, it is the single child element of the ListView that android is going to use to inflate your custom view layout (ya, the one you defined in xml… if you have note done that yet, better do it now!).
Now a word on how it all works – the concept behind convertView. You see, your ListView,which you are going to populate with your custom elements, needs to know how many of them will fit the device screen at a given time. This is the job for Android to carry out. According to the parameters like height, width of the element, which you have (I hope) defined in the xml file for that custom view, and the screen metrics (height and width of the screen), Android will calculate how many of the elements can fill into the screen at one time. Say, that number is 7. This means, when your list view is first initialized, 7 items (even the partially displayed ones count) are displayed, with 7 calls going to the getView method in your adapter.During these first 7 calls, the convertView parameter is null, since there is no existing container to inflate your views in. Hence you must inflate your views for the first time in the
1 2 3 |
if(convertView == null){
     //Inflate Views here from xml and no other task
}
|
block.
Now, what happens as you scroll from the 7th element to the 8th. Obviously, your screen can only display 7 elements at a time (as assumed earlier) so the 1st element will go out of view once the 8th element is brought up. Again a call to getView() will be made, but the difference this time is that convertView will not be null. Android would recycle the container used to inflate the first element since the first element is no longer required in memory. When the list is scrolled up again to the first element, again a getView call, but this time convertView won’t be null, as the 8th element’s container will be used. This cycle and re-cycle of containers is repeated as we scroll up and down the list with subsequent calls to getView().
Hence, one must be careful to assign values to different variables inside the custom element/view, outside the block where we check convertView to be null, as otherwise, all elements after the 7th element as in our case, shall start repeating !
A Simple List View with custom elements
There you have it… convertView : Decoded 🙂
Holo Action Bar and Layout preview in Android studio
Preview in Android studio
Android studio layout preview function makes life so easy, you can choose your theme, API level to preview. So it’s very easy to simultaneously develop themes under different APIs. At the moment, I am developing two themes. One is for API 21 Lollipop and API 15 for IceCreamSandwich. API 15 will cover 90.4% of devices that are active on Google Play store.
Holo Action Bar
Background:
<?xml version="1.0" encoding="utf-8"?>
<resources>
    <!-- the theme applied to the application or activity -->
    <style name="CustomActionBarTheme"
           parent="@android:style/Theme.Holo.Light.DarkActionBar">
        <item name="android:actionBarStyle">@style/MyActionBar</item>
    </style>

    <!-- ActionBar styles -->
    <style name="MyActionBar"
           parent="@android:style/Widget.Holo.Light.ActionBar.Solid.Inverse">
        <item name="android:background">@drawable/actionbar_background</item>
    </style>
</resources>
