今天的柔术实战比上周六感觉体力好多了。。上周六的简直天旋地转。。拉了老王和JASON一起去,一定要想办法说服他们一直去。。
SIDE CONTROL ESCAPE还是不行,稍微会防了点,知道两手要CONNECT,还继续学YOUTUBE吧
睡成外星人的阿呆

今天的柔术实战比上周六感觉体力好多了。。上周六的简直天旋地转。。拉了老王和JASON一起去,一定要想办法说服他们一直去。。
SIDE CONTROL ESCAPE还是不行,稍微会防了点,知道两手要CONNECT,还继续学YOUTUBE吧
睡成外星人的阿呆
• It must be a client-server system
• It has to be stateless—there should be no need for the service to keep users’
sessions; in other words, each request should be independent of others
• It has to support a caching system—the network infrastructure should
support cache at different levels
• It has to be uniformly accessible—each resource must have a unique address
and a valid point of access
• It has to be layered—it must support scalability
• It should provide code on demand—although this is an optional constraint,
applications can be extendable at runtime by allowing the downloading of
code on demand, for example, Java Applets
The Single Responsibility Principle
THERE SHOULD NEVER BE MORE THAN ONE REASON FOR A CLASS TO CHANGE
one class should only have one responsibility. for example, in a server and client example. Client might have functions of make connection and sending messages. it sounds perfect reasonable but it actually has two responsibilities. The drawback of this is 1. eg when two different application use this class. one might only use the connecting function whereas the other one using chatting function. they have to include both codes in when compile. 2 when they change some code for connection method. it might result chatting function in class not working.
The Open-Closed Principle
http://www.objectmentor.com/resources/articles/ocp.pdf
A method should be deigned open to the extension but closed for the modification. The key is using abstraction. For example, you might have a method of drawShapes(ShapeType shapeType). in the method, you have case “SQUARE”, case “RECTANGLE” and so on. To add a CIRCLE in, you will have to edit the method body. Instead, you can have a interface of Shape, using add(Shape shape) to add in additional shapes. then iterate the list and draw the shapes. in this way, the principle is maintained.
Multit-hreading and synchronization is a very important topic for any Java programmer. Good knowledge of multithreading, synchronization, and thread-safety can put you in front of other developers, at same time it’s not easy to master these concept. In fact writing correct concurrent code is one of the hardest thing, even in Java, which has several inbuilt synchronization utilities. In this Java synchronization tutorial we will learn what is meaning of Synchronization in Java, Why do we need Synchronization in Java, What is java synchronized keyword, examples of using Java synchronized method and blocks, What can happen in multithreading code in absence of synchronized constructs, tips to avoid mistakes, while locking critical section in Java and some of importantpoints about synchronization in Java. Since Java provides different constructs to provide synchronization and locking e.g. volatile keyword, atomic variable, explicitly locking using java.util.concurrent.lock.Lock interface and there popular implementations e.g. ReentrantLock and ReentrantReadWriteLock, It becomes even more important to understand difference between synchronized and other constructs. Remember, clear understanding of synchronization is must to write correct concurrent code in Java, which is free of multithreading issues like deadlock, race conditions and thread-safety. I am sure, things learned in this Java synchronization tutorial will help. Once you gone through this article, You can further read Java Concurrency in Practice to develop your concept. That’s the one of those book which every Java developer must read.
Synchronization in Java is an important concept since Java is a multi-threaded language where multiple threads run in parallel to complete program execution. In multi-threaded environment synchronization of Java object or synchronization of Java class becomes extremely important. Synchronization in Java is possible by using Java keywords “synchronized” and “volatile”. Concurrent access of shared objects in Java introduces to kind of errors: thread interference and memory consistency errors and to avoid these errors you need to properly synchronize your Java object to allow mutual exclusive access of critical section to two threads. By the way This Java Synchronization tutorial is in continuation of my article How HashMap works in Java and difference between HashMap and Hashtable in Java if you haven’t read already you may find some useful information based on my experience in Java Collections.
If your code is executing in multi-threaded environment, you need synchronization for objects, which are shared among multiple threads, to avoid any corruption of state or any kind of unexpected behavior. Synchronization in Java will only be needed if shared object is mutable. if your shared object is either read only or immutable object, than you don’t need synchronization, despite running multiple threads. Same is true with what threads are doing with object if all the threads are only reading value then you don’t require synchronization in Java. JVM guarantees that Java synchronized code will only be executed by one thread at a time. In Summary Java synchronized Keyword provides following functionality essential for concurrent programming :
1) synchronized keyword in Java provides locking, which ensures mutual exclusive access of shared resource and prevent data race.
2) synchronized keyword also prevent reordering of code statement by compiler which can cause subtle concurrent issue if we don’t use synchronized or volatile keyword.
3) synchronized keyword involve locking and unlocking. before entering into synchronized method or block thread needs to acquire the lock, at this point it reads data from main memory than cache and when it release the lock, it flushes write operation into main memory which eliminates memory inconsistency errors.
Prior to Java 1.5 synchronized keyword was only way to provide synchronization of shared object in Java. Any code written by using synchronized block or enclosed inside synchronized method will be mutually exclusive, and can only be executed by one thread at a time. You can have both static synchronized method and non static synchronized method and synchronized blocks in Java but we can not have synchronized variable in java. Using synchronized keyword with variable is illegal and will result in compilation error. Instead of synchronized variable in Java, you can have java volatile variable, which will instruct JVM threads to read value of volatile variable from main memory and don’t cache it locally. Block synchronization in Java is preferred over method synchronization in Java because by using block synchronization, you only need to lock the critical section of code instead of whole method. Since synchronization in Java comes with cost of performance, we need to synchronize only part of code which absolutely needs to be synchronized.
Using synchronized keyword along with method is easy just apply synchronized keyword in front of method. What we need to take care is that static synchronized method locked on class object lock and non static synchronized method locks on current object (this). So it’s possible that both static and non static java synchronized method running in parallel. This is the common mistake a naive developer do while writing Java synchronized code.
public class Counter{ private static int count = 0; public static synchronized int getCount(){ return count; } public synchoronized setCount(int count){ this.count = count; } }
In this example of Java synchronization code is not properly synchronized because both getCount() and setCount() are not getting locked on same object and can run in parallel which may results in incorrect count. Here getCount() will lock inCounter.class object while setCount() will lock on current object (this). To make this code properly synchronized in Java you need to either make both method static or non static or use java synchronized block instead of java synchronized method.By the way this is one of the common mistake Java developers make while synchronizing their code.
Using synchronized block in java is also similar to using synchronized keyword in methods. Only important thing to note here is that if object used to lock synchronized block of code, Singleton.class in below example is null then Java synchronized block will throw a NullPointerException.
public class Singleton{ private static volatile Singleton _instance; public static Singleton getInstance(){ if(_instance == null){ synchronized(Singleton.class){ if(_instance == null) _instance = new Singleton(); } } return _instance; }
This is a classic example of double checked locking in Singleton. In this example of Java synchronized code, we have made only critical section (part of code which is creating instance of singleton) synchronized and saved some performance. If you make wholemethod synchronized than every call of this method will be blocked, while you only need blocking to create singleton instance on first call. By the way, this is not the only way to write threadsafe singleton in Java. You can use Enum, or lazy loading to avoid thread-safety issue during instantiation. Even above code will not behave as expected because prior to Java 1.5, double checked locking was broker and even with volatile variable you can view half initialized object. Introduction of Java memory model and happens before guarantee in Java 5 solves this issue. To read more about Singleton in Java see that.
private String lock = new String(“lock”); synchronized(lock){ System.out.println(“locking on :” + lock); }
any if you write synchronized code like above in java you may get warning “Synchronization on non-final field” in IDE like Netbeans and InteliJ
private static final String LOCK = “lock”; //not recommended private static final Object OBJ_LOCK = new Object(); //better public void process() { synchronized(LOCK) { …….. } }
Probably most important point about Synchronization in Java is that, in the absence of synchronized keyword or other construct e.g. volatile variable or atomic variable, compiler, JVM and hardware are free to make optimization, assumption, reordering or caching of code and data, which can cause subtle concurrency bugs in code. By introducing synchronization by using volatile, atomic variable or synchronized keyword, we instruct compiler and JVM to not to do that.
Update 1: Recently I have been reading several Java Synchronization and Concurrency articles in internet and I come across jeremymanson’s blog which works in google and has worked on JSR 133 Java Memory Model, I would recommend some of this blog post for every java developer, he has covered certain details about concurrent programming , synchronization and volatility in simple and easy to understand language, here is the link atomicity, visibility and ordering.
Update 2: I am grateful to my readers, who has left some insightful comments on this post. They have shared lots of good information and experience and to provide them more exposure, I am including some of there comments on main article, to benefit new readers.
@Vikas wrote
Good comprehensive article about synchronized keyword in Java. to be honest I have never read all these details about synchronized block or method at one place. you may want to highlight some limitation of synchronized keyword in Java which is addressed by explicit locking using new concurrent package and Lock interface :
1. synchronized keyword doesn’t allow separate locks for reading and writing. as we know that multiple thread can read without affecting thread-safety of class, synchronized keyword suffer performance due to contention in case of multiple reader and one or few writer.
2. if one thread is waiting for lock then there is no way to time out, thread can wait indefinitely for lock.
All these limitation of synchronized keyword is addressed and resolved by using ReadWriteLock and ReentrantLock in Java 5.
@George wrote
Just my 2 cents on your great list of Java Synchronization facts and best practices :
1) synchronized keyword in internally implemented using two byte code instructions MonitorEnter and MonitorExit, this is generated by compiler. Compiler also ensures that there must be a MonitorExit for every MonitorEnter in different code path e.g. normal execution and abrupt execution, because of Exception.
2) java.util.concurrent package different locking mechanism than provided by synchronized keyword, they mostly used ReentrantLock, which internally use CAS operations, volatile variables and atomic variables to get better performance.
3) With synchronized keyword, you have to leave the lock, once you exist a synchronized method or block, there is no way you can take the lock to other method. java.util.concurrent.locks.ReentrantLock solves this problem by providing control for acquiring and releasing lock, which means you can acquire lock in method A and can release in method B, if they both needs to be locked in same object lock. Though this could be risky as compiler will neither check nor warn you about any accidental leak of locks. Which means, this can potentially block other threads, which are waiting for same lock.
4) Prefer ReentrantLock over synchronized keyword, it provides more control on lock acquisition, lock release and better performance compared to synchronized keyword.
5) Any thread trying to acquire lock using synchronized method will block indefinitely, until lock is available. Instead this, tryLock() method of java.util.concurrent.locks.ReentrantLock will not block if lock is not available.
Having said that, I must say, lots of good information.
Synchronization and Concurrency is complex topic in Java and it’s not easy to master them. Even more experienced Java developers struggle to write correct concurrent code in Java. I would highly recommend following Java books to master multi-threading, synchronization and Concurrency.
Read more: http://javarevisited.blogspot.com/2011/04/synchronization-in-java-synchronized.html#ixzz3ilDqjVzf
If you’ve ever opened a PC case and stared inside, or looked at a bare motherboard, you may be taken aback by the number and variety of connectors, pins, and slots that exist on a modern PC motherboard. In this guide I’ll identify some of the most common (and a few uncommon) connectors on motherboards used in most home PCs. I won’t cover server- or workstation-class boards here, just what you might find in a typical midrange or high-end home PC.
For a similar discussion of the ports that you’re likely to encounter on the exterior of a PC case, see “Multiple Ports on Your PC: What Do They Do for You?”
Since no single motherboard contains every type of connectors, I’ve used photos of four different boards to illustrate key examples. In one or two instances, there is some overlap; but for the most part, connectors are mentioned only once. Many of them may exist across different motherboard designs, however.
Let’s start with an older motherboard, an Asus P5WDH Deluxe. This motherboard has a few connectors that aren’t included on current-generation boards, as wll as some that do are still included, but are more readily visible here.

Audio front panel: This ten-pin connector links to the front-panel headphone and microphone inputs. The particular connector shown is an AC97 connector, which existed prior to multichannel HD audio. It’s still in common use today.
Azalia digital audio header: You rarely find this connector, used to tie the motherboard to multichannel digital outputs on the case, on current motherboards.
Serial-port header: This connector isn’t physically present on the board shown–you can just see the solder points for it. But this header does appear on a few modern boards. It supports a nine-pin, RS-232 serial port, usually as a bracket that occupies a slot space on the back of the case. A number of RS-232 connections remain in use today, mostly in point-of-sale devices or specialized test instruments. Consumer boards typically don’t have them.
FireWire (IEEE 1994a): Once common as a digital camcorder interface, FireWire has largely been supplanted by USB, and the motherboard makers are gradually phasing it out. Some professional audio hardware still uses FireWire, though; you may also occasionally find higher-speed IEEE 1394b headers, but they are even rarer.
USB 2.0 front panel: These connectors are used to link to the front-panel USB ports on PC cases.
SATA connectors: These components connect via cables to various storage devices, including hard-disk drives, solid-state drives, and optical drives.
IDE connector: Rarely found today, IDE connectors were used to link to older hard drives. In addition, until a couple of years ago, many optical drives supported IDE. Today, all new storage devices ship with SATA.
Floppy disk connector: The venerable 3.5-inch floppy disk drive survived for nearly two decades–an eternity in the tech universe. But unless you have a pile of old floppies, you won’t need a floppy drive. And if you do find yourself needing a floppy drive, you can always pick up an external, USB-connected drive.
Now let’s examine a more recent motherboard: an Intel D67BG, based on Intel’s P67 chipset and supporting LGA 1155 CPUs (like the Sandy Bridge-based Core i7-2600K).

DDR3 memory sockets: Current-generation PC systems use DDR3 memory, but in many instances they support different operating speeds. The P67 chipset used in this board maxes out at DDR3-1600, but to achieve that level of speed you’d have to overclock the chipset–officially the P67 supports only DDR3-1333. Here, we see four memory sockets. The system supports dual-channel memory, meaning that the system is populated with paired memory modules, which are mounted in sockets of the same color.
CPU fan header: This connector is specifically designed to link to the CPU cooling fan. The system BIOS monitors CPU cooling fan speeds; and if the fan isn’t connected to this header, you may get an error at bootup.
Eight-pin ATX12V (CPU power) connector: Back when the Pentium 4 processor first shipped, Intel realized that high-performance CPUs needed their own source of clean, dedicated power beyond what the standard 24-pin power connector could deliver. Thus was born ATX12V. You’ll see four-pin connectors on lower-end boards supporting CPUs with lower thermal design power (TDP), but the eight-pin version of the connector is used with higher-end processors and on boards that users may overclock.
Power for secondary fans: Many motherboards with secondary-fan power headers; these connectors are mainly used to power and monitor various case fans.
PCI Express x1 connector: PCI Express is a serial interface, though multiple lanes may be ganged together. The “x1” refers to a slot supporting a single PCI Express lane; it is used for I/O devices that don’t require bidirectional bandwidth greater than 500 megabytes per second (gen 1 PCIe). Sound cards, for example, are typically PCIe x1 devices.
PCI Express x16 (graphics): PCI Express x16 slots are used mostly for graphics cards, though they can be used with any PCI Express card. Confusion may arise, however, because not all PCIe x16 slots are true PCIe x16. Occasionaly, you’ll see PCIe x16 connectors that are physical slots for accommodating graphics cards, but are actually eight-lane (x8) or even four-lane (x4) electrically.
On some boards, even slots that support true 16-lane PCI Express for graphics may revert to eight lanes if you install a second graphics card into a second PCIe x16 slot on the motherboard. The P67 chipset, for instance, has only 16 total PCIe lanes for graphics. So if you drop in two graphics cards to run in dual GPU mode, each card will have just eight lanes available to it. This situation isn’t as bad as it sounds, though, since even eight lanes in a PCIe 2.0- or 3.0-based system delivers plenty of bandwidth for most games.
32-bit legacy PCI slot: The now-classic 32-bit PCI slot has been around since 1993. A host of expansion cards support 32-bit PCI; and to accommodate them, most motherboards are likely to have at least one 32-bit PCI slot going forward. You may see some system boards configured so that a particular back-panel case bracket can support either a PCI slot or a PCIe slot, with some overlap between the two because they’re very close together.
Front-panel switch header: This header connects various wires to the front panel of the case, where they link to power and reset buttons, and status LEDs for power and storage-drive activity.
Next we’ll turn our attention to a motherboard that supports AMD CPUs. Note that AMD-chipset boards support many of the same features as Intel-based boards–that’s the great thing about industry standards.

24-pin ATX power: This connector exists on all current ATX-based motherboards, and is the standard means of connecting power from power supplies. This connector delivers power to all interfaces, including 3V, 5V, and 12V. The typical ATX12V version 2.3 PSU delivers up to 75W for PCI Express graphics cards; but numerous modern graphics cards need more than that, which is why you’ll often find secondary six- or eight-pin power connectors on the graphics cards themselves.
ATX4P: This unusual item is actually a SATA power connector for delivering power to SSDs, hard drives, or optical drives from the motherboard itself.
TPM connector: Some off-the-shelf PCs and laptops use the Trusted Platform Module connector to link to a cryptographic processor module for storing encryption keys and handling dedicated encryption chores such as hard-drive encryption and certain types of digital rights management (DRM) decryption.
USB 3.0 front panel: This connector is used to drive front-panel USB 3.0 connectors. It requires more pins than USB 2.0 connectors do, but it drives two USB 3.0 ports instead of one. If your PC case lacks a USB 3.0 internal cable, you won’t be able to use it. Like back-panel connectors, front-panel USB 3.0 ports are often color-coded blue.
AMD CPU socket: I’m calling out this component because its style differs from that of a modern Intel CPU socket. AMD CPUs still have pins, whereas Intel has moved the pins to the motherboard socket.
I’m using a photo of just one section of this board, to call out some specific connectors and to get a little closer in. The Intel DZ77GA-70K motherboard is designed to accommodate the latest Intel Z77 chipset.

Case fan header: As noted earlier, most higher-end motherboards have several of these fan headers scattered around the board. If enough of them are available, you should connect your fans to them, so that the BIOS can monitor and manage the fan speeds–unless you’re a serious overclocker who uses separate fan-control modules.
PCI Express x4 slot: This relatively rare physical and electrical PCIe x4 slot is used for higher-performance networking cards and for some storage controller cards.
S/PDIF digital audio: This older type of connector was originally used to connect to CD-ROM drives. Today it’s still used to connect to some optical drives and other audio devices that support S/PDIF (Sony/Philips Digital Interface) digital audio.
USB 3.0 front panel: The DZ77GA motherboard ships with two front-panel USB 3.0 connectors, driving up to four USB 3.0 ports on the front of the PC case.
High-current USB 2.0 front panel: This is a slightly different type of USB 2.0 connector. Though it acts as a normal USB 2.0 port when sending or receiving data, it can deliver extra current to permit fast charging of mobile devices, and it can even charge devices (like Apple’s iPad) that requires more current than standard USB 2.0 normally delivers.
Consumer IR: This connector is used to attach front-panel infrared receivers, which enable users to control the PC via a standard programmable remote.
Diagnostic LEDs: Most motherboards have simple LEDs that light up or change color if the board experiences problems. A few higher-end boards, however, have these status LEDs, which flash an alphanumeric code that helps the user narrow down the source of a boot problem.
That wraps up our tour of various motherboard connectors, pins, and ports. Though I haven’t covered all of the possibilities by any means, the ones listed here account for the vast majority of connectors you’ll encounter on today’s motherboards.
Rarely will you use every single connector on a board, but understanding these connectors should help you choose a PC case that suits your needs, or that accommodates new devices that you plan to add in an upgrade. Also, if you have a specific need, you’ll be better able to shop for a motherboard capable of handling your application.
In java we have already defined exception classes such asArithmeticException, ArrayIndexOutOfBoundsException,NullPointerException etc. There are certain conditions defined for these exceptions and on the occurrence of those conditions they are implicitly thrown by JVM(java virtual machine).
Do you know that a programmer can create a new exception and throw it explicitly? These exceptions are known as user-defined exceptions. In order to throw user defined exceptions, throw keyword is being used. In this tutorial, we will see how to create a new exception and throw it in a program using throw keyword.
You can also throw an already defined exception like ArithmeticException,IOException etc.
throw AnyThrowableInstance;
Example:
//A void method
public void sample()
{
   //Statements
   //if (somethingWrong) then
   IOException e = new IOException();
   throw e;
   //More Statements
 }
Note:
IOException. This is how it the call to above method should be done:
MyClass obj =  new MyClass();
try{
      obj.sample();
}catch(IOException ioe)
 {
      //Your error Message here
      System.out.println(ioe);
  }
Flow of execution while throwing an exception using throw keyword
Whenever a throw statement is encountered in a program the next statement doesn’t execute. Control immediately transferred to catch block to see if the thrown exception is handled there. If the exception is not handled there then next catch block is being checked for exception and so on. If none of thecatch block is handling the thrown exception then a system generated exception message is being populated on screen, same what we get for un-handled exceptions.
E.g.
class ThrowDemo{
   public static void main(String args[]){
      try{
	   char array[] = {'a','b','g','j'};
	   /*I'm displaying the value which does not
	    * exist so this should throw an exception
	    */
	   System.out.println(array[78]);
      }catch(ArithmeticException e){
	    System.out.println("Arithmetic Exception!!");
       }
   }
}
Output:
Exception in thread "main" java.lang.ArrayIndexOutOfBoundsException:
78 at beginnersbook.com.ThrowDemo.main(Details.java:9)
Since the exception thrown was not handled in the catch blocks the system generated exception message got displayed for that particular exception.
Example 1: How to throw your own exception explicitly using throw keyword
package beginnersbook.com;
class MyOwnException extends Exception {
   public MyOwnException(String msg){
      super(msg);
   }
}

class EmployeeTest {
   static void  employeeAge(int age) throws MyOwnException{
      if(age < 0)
         throw new MyOwnException("Age can't be less than zero");
      else
         System.out.println("Input is valid!!");
   }
   public static void main(String[] args) {
       try {
            employeeAge(-2);
       }
       catch (MyOwnException e) {
            e.printStackTrace();
       }
   }
}
Output:
beginnersbook.com.MyOwnException: Age can't be less than zero
Points to Note: Method call should be in try block as it is throwing an exception.
Example2: How to throw an already defined exception using throw keyword
package beginnersbook.com;
class Exception2{
   static int sum(int num1, int num2){
      if (num1 == 0)
         throw new ArithmeticException("First parameter is not valid");
      else
         System.out.println("Both parameters are correct!!");
      return num1+num2;
   }
   public static void main(String args[]){
      int res=sum(0,12);
      System.out.println(res);
      System.out.println("Continue Next statements");
   }
}
Output:
Exception in thread main java.lang.ArithmeticException: First parameter is not valid
Similarly other exceptions, such as NullPointerException,ArrayIndexOutOfBoundsException etc. can be thrown. That’s all for the topic how to throw exception in java. Let me know your feedback on this.
1. The throws keyword is used in method declaration, in order to explicitly specify the exceptions that a particular method might throw. When a method declaration has one or more exceptions defined using throws clause then the method-call must handle all the defined exceptions.
2. When defining a method you must include a throws clause to declare those exceptions that might be thrown but doesn’t get caught in the method.
3. If a method is using throws clause along with few exceptions then this implicitly tells other methods that – “ If you call me, you must handle these exceptions that I throw”.
void MethodName() throws ExceptionName{
    Statement1
    ...
    ...
}
E.g:
public void sample() throws IOException{
     //Statements
     //if (somethingWrong)
     IOException e = new IOException();
     throw e;
     //More Statements
}
Note: In case a method throws more than one exception, all of them should be listed in throws clause. PFB the example to understand the same.
public void sample() throws IOException, SQLException
{
    //Statements
}
The above method has both IOException and SQLException listed in throws clause. There can be any number of exceptions defined using throws clause.
class Demo
{
   static void throwMethod() throws NullPointerException
   {
       System.out.println ("Inside throwMethod");
       throw new NullPointerException ("Demo");
   }
   public static void main(String args[])
   {
       try
       {
          throwMethod();
       }
       catch (NullPointerException exp)
       {
          System.out.println ("The exception get caught" +exp);
       }
    }
}
The output of the above program is:
Inside throwMethod
The exception get caught java.lang.IllegalAccessException: Demo
Error:Execution failed for task ‘:lomeal:compileRetrolambdaDebug’.
> A problem occurred starting process ‘command ‘C:\Program Files\Java\jdk1.8.0_45\bin\java.exe”
when you meet the problem like above, the only thing you need to do is clean your project. It sometimes happens when you merge your project branch to anther person’s
Ever wonder about that mysterious Content-Type tag? You know, the one you’re supposed to put in HTML and you never quite know what it should be?
Did you ever get an email from your friends in Bulgaria with the subject line “???? ?????? ??? ????”?
 I’ve been dismayed to discover just how many software developers aren’t really completely up to speed on the mysterious world of character sets, encodings, Unicode, all that stuff. A couple of years ago, a beta tester for FogBUGZ was wondering whether it could handle incoming email in Japanese. Japanese? They have email in Japanese? I had no idea. When I looked closely at the commercial ActiveX control we were using to parse MIME email messages, we discovered it was doing exactly the wrong thing with character sets, so we actually had to write heroic code to undo the wrong conversion it had done and redo it correctly. When I looked into another commercial library, it, too, had a completely broken character code implementation. I corresponded with the developer of that package and he sort of thought they “couldn’t do anything about it.” Like many programmers, he just wished it would all blow over somehow.
But it won’t. When I discovered that the popular web development tool PHP has almost complete ignorance of character encoding issues, blithely using 8 bits for characters, making it darn near impossible to develop good international web applications, I thought, enough is enough.
So I have an announcement to make: if you are a programmer working in 2003 and you don’t know the basics of characters, character sets, encodings, and Unicode, and I catch you, I’m going to punish you by making you peel onions for 6 months in a submarine. I swear I will.
And one more thing:
IT’S NOT THAT HARD.
In this article I’ll fill you in on exactly what every working programmer should know. All that stuff about “plain text = ascii = characters are 8 bits” is not only wrong, it’s hopelessly wrong, and if you’re still programming that way, you’re not much better than a medical doctor who doesn’t believe in germs. Please do not write another line of code until you finish reading this article.
Before I get started, I should warn you that if you are one of those rare people who knows about internationalization, you are going to find my entire discussion a little bit oversimplified. I’m really just trying to set a minimum bar here so that everyone can understand what’s going on and can write code that has a hope of working with text in any language other than the subset of English that doesn’t include words with accents. And I should warn you that character handling is only a tiny portion of what it takes to create software that works internationally, but I can only write about one thing at a time so today it’s character sets.
A Historical Perspective
The easiest way to understand this stuff is to go chronologically.
You probably think I’m going to talk about very old character sets like EBCDIC here. Well, I won’t. EBCDIC is not relevant to your life. We don’t have to go that far back in time.
 Back in the semi-olden days, when Unix was being invented and K&R were writing The C Programming Language, everything was very simple. EBCDIC was on its way out. The only characters that mattered were good old unaccented English letters, and we had a code for them called ASCIIwhich was able to represent every character using a number between 32 and 127. Space was 32, the letter “A” was 65, etc. This could conveniently be stored in 7 bits. Most computers in those days were using 8-bit bytes, so not only could you store every possible ASCII character, but you had a whole bit to spare, which, if you were wicked, you could use for your own devious purposes: the dim bulbs at WordStar actually turned on the high bit to indicate the last letter in a word, condemning WordStar to English text only. Codes below 32 were called unprintable and were used for cussing. Just kidding. They were used for control characters, like 7 which made your computer beep and 12 which caused the current page of paper to go flying out of the printer and a new one to be fed in.
And all was good, assuming you were an English speaker.
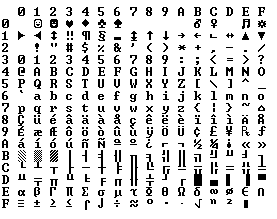
 Because bytes have room for up to eight bits, lots of people got to thinking, “gosh, we can use the codes 128-255 for our own purposes.” The trouble was,lots of people had this idea at the same time, and they had their own ideas of what should go where in the space from 128 to 255. The IBM-PC had something that came to be known as the OEM character set which provided some accented characters for European languages and a bunch of line drawing characters… horizontal bars, vertical bars, horizontal bars with little dingle-dangles dangling off the right side, etc., and you could use these line drawing characters to make spiffy boxes and lines on the screen, which you can still see running on the 8088 computer at your dry cleaners’. In fact as soon as people started buying PCs outside of America all kinds of different OEM character sets were dreamed up, which all used the top 128 characters for their own purposes. For example on some PCs the character code 130 would display as é, but on computers sold in Israel it was the Hebrew letter Gimel (
![]() ), so when Americans would send their résumés to Israel they would arrive asr
), so when Americans would send their résumés to Israel they would arrive asr![]() sum
sum![]() s. In many cases, such as Russian, there were lots of different ideas of what to do with the upper-128 characters, so you couldn’t even reliably interchange Russian documents.
s. In many cases, such as Russian, there were lots of different ideas of what to do with the upper-128 characters, so you couldn’t even reliably interchange Russian documents.
Eventually this OEM free-for-all got codified in the ANSI standard. In the ANSI standard, everybody agreed on what to do below 128, which was pretty much the same as ASCII, but there were lots of different ways to handle the characters from 128 and on up, depending on where you lived. These different systems were called code pages. So for example in Israel DOS used a code page called 862, while Greek users used 737. They were the same below 128 but different from 128 up, where all the funny letters resided. The national versions of MS-DOS had dozens of these code pages, handling everything from English to Icelandic and they even had a few “multilingual” code pages that could do Esperanto and Galician on the same computer! Wow!But getting, say, Hebrew and Greek on the same computer was a complete impossibility unless you wrote your own custom program that displayed everything using bitmapped graphics, because Hebrew and Greek required different code pages with different interpretations of the high numbers.
Meanwhile, in Asia, even more crazy things were going on to take into account the fact that Asian alphabets have thousands of letters, which were never going to fit into 8 bits. This was usually solved by the messy system called DBCS, the “double byte character set” in whichsome letters were stored in one byte and others took two. It was easy to move forward in a string, but dang near impossible to move backwards. Programmers were encouraged not to use s++ and s– to move backwards and forwards, but instead to call functions such as Windows’ AnsiNext and AnsiPrev which knew how to deal with the whole mess.
But still, most people just pretended that a byte was a character and a character was 8 bits and as long as you never moved a string from one computer to another, or spoke more than one language, it would sort of always work. But of course, as soon as the Internet happened, it became quite commonplace to move strings from one computer to another, and the whole mess came tumbling down. Luckily, Unicode had been invented.
Unicode
Unicode was a brave effort to create a single character set that included every reasonable writing system on the planet and some make-believe ones like Klingon, too. Some people are under the misconception that Unicode is simply a 16-bit code where each character takes 16 bits and therefore there are 65,536 possible characters. This is not, actually, correct. It is the single most common myth about Unicode, so if you thought that, don’t feel bad.
In fact, Unicode has a different way of thinking about characters, and you have to understand the Unicode way of thinking of things or nothing will make sense.
Until now, we’ve assumed that a letter maps to some bits which you can store on disk or in memory:
A -> 0100 0001
In Unicode, a letter maps to something called a code point which is still just a theoretical concept. How that code point is represented in memory or on disk is a whole nuther story.
In Unicode, the letter A is a platonic ideal. It’s just floating in heaven:
A
This platonic A is different than B, and different from a, but the same as A and A and A. The idea that A in a Times New Roman font is the same character as the A in a Helvetica font, but differentfrom “a” in lower case, does not seem very controversial, but in some languages just figuring out what a letter is can cause controversy. Is the German letter ß a real letter or just a fancy way of writing ss? If a letter’s shape changes at the end of the word, is that a different letter? Hebrew says yes, Arabic says no. Anyway, the smart people at the Unicode consortium have been figuring this out for the last decade or so, accompanied by a great deal of highly political debate, and you don’t have to worry about it. They’ve figured it all out already.
Every platonic letter in every alphabet is assigned a magic number by the Unicode consortium which is written like this: U+0639. This magic number is called a code point. The U+ means “Unicode” and the numbers are hexadecimal. U+0639 is the Arabic letter Ain. The English letter A would be U+0041. You can find them all using thecharmap utility on Windows 2000/XP or visiting the Unicode web site.
There is no real limit on the number of letters that Unicode can define and in fact they have gone beyond 65,536 so not every unicode letter can really be squeezed into two bytes, but that was a myth anyway.
OK, so say we have a string:
Hello
which, in Unicode, corresponds to these five code points:
U+0048 U+0065 U+006C U+006C U+006F.
Just a bunch of code points. Numbers, really. We haven’t yet said anything about how to store this in memory or represent it in an email message.
Encodings
That’s where encodings come in.
The earliest idea for Unicode encoding, which led to the myth about the two bytes, was, hey, let’s just store those numbers in two bytes each. So Hello becomes
00 48 00 65 00 6C 00 6C 00 6F
Right? Not so fast! Couldn’t it also be:
48 00 65 00 6C 00 6C 00 6F 00 ?
Well, technically, yes, I do believe it could, and, in fact, early implementors wanted to be able to store their Unicode code points in high-endian or low-endian mode, whichever their particular CPU was fastest at, and lo, it was evening and it was morning and there were already two ways to store Unicode. So the people were forced to come up with the bizarre convention of storing a FE FF at the beginning of every Unicode string; this is called a Unicode Byte Order Mark and if you are swapping your high and low bytes it will look like a FF FE and the person reading your string will know that they have to swap every other byte. Phew. Not every Unicode string in the wild has a byte order mark at the beginning.

For a while it seemed like that might be good enough, but programmers were complaining. “Look at all those zeros!” they said, since they were Americans and they were looking at English text which rarely used code points above U+00FF. Also they were liberal hippies in California who wanted to conserve (sneer). If they were Texans they wouldn’t have minded guzzling twice the number of bytes. But those Californian wimps couldn’t bear the idea of doubling the amount of storage it took for strings, and anyway, there were already all these doggone documents out there using various ANSI and DBCS character sets and who’s going to convert them all? Moi? For this reason alone most people decided to ignore Unicode for several years and in the meantime things got worse.
Thus was invented the brilliant concept of UTF-8. UTF-8 was another system for storing your string of Unicode code points, those magic U+ numbers, in memory using 8 bit bytes. In UTF-8, every code point from 0-127 is stored in a single byte. Only code points 128 and above are stored using 2, 3, in fact, up to 6 bytes.

This has the neat side effect that English text looks exactly the same in UTF-8 as it did in ASCII, so Americans don’t even notice anything wrong. Only the rest of the world has to jump through hoops. Specifically, Hello, which was U+0048 U+0065 U+006C U+006C U+006F, will be stored as 48 65 6C 6C 6F, which, behold! is the same as it was stored in ASCII, and ANSI, and every OEM character set on the planet. Now, if you are so bold as to use accented letters or Greek letters or Klingon letters, you’ll have to use several bytes to store a single code point, but the Americans will never notice. (UTF-8 also has the nice property that ignorant old string-processing code that wants to use a single 0 byte as the null-terminator will not truncate strings).
So far I’ve told you three ways of encoding Unicode. The traditional store-it-in-two-byte methods are called UCS-2 (because it has two bytes) or UTF-16 (because it has 16 bits), and you still have to figure out if it’s high-endian UCS-2 or low-endian UCS-2. And there’s the popular new UTF-8 standard which has the nice property of also working respectably if you have the happy coincidence of English text and braindead programs that are completely unaware that there is anything other than ASCII.
There are actually a bunch of other ways of encoding Unicode. There’s something called UTF-7, which is a lot like UTF-8 but guarantees that the high bit will always be zero, so that if you have to pass Unicode through some kind of draconian police-state email system that thinks 7 bits are quite enough, thank you it can still squeeze through unscathed. There’s UCS-4, which stores each code point in 4 bytes, which has the nice property that every single code point can be stored in the same number of bytes, but, golly, even the Texans wouldn’t be so bold as to waste that much memory.
And in fact now that you’re thinking of things in terms of platonic ideal letters which are represented by Unicode code points, those unicode code points can be encoded in any old-school encoding scheme, too! For example, you could encode the Unicode string for Hello (U+0048 U+0065 U+006C U+006C U+006F) in ASCII, or the old OEM Greek Encoding, or the Hebrew ANSI Encoding, or any of several hundred encodings that have been invented so far, with one catch: some of the letters might not show up! If there’s no equivalent for the Unicode code point you’re trying to represent in the encoding you’re trying to represent it in, you usually get a little question mark: ? or, if you’rereally good, a box. Which did you get? -> �
There are hundreds of traditional encodings which can only storesome code points correctly and change all the other code points into question marks. Some popular encodings of English text are Windows-1252 (the Windows 9x standard for Western European languages) and ISO-8859-1, aka Latin-1 (also useful for any Western European language). But try to store Russian or Hebrew letters in these encodings and you get a bunch of question marks. UTF 7, 8, 16, and 32 all have the nice property of being able to store any code point correctly.
The Single Most Important Fact About Encodings
If you completely forget everything I just explained, please remember one extremely important fact. It does not make sense to have a string without knowing what encoding it uses. You can no longer stick your head in the sand and pretend that “plain” text is ASCII.
There Ain’t No Such Thing As Plain Text.
If you have a string, in memory, in a file, or in an email message, you have to know what encoding it is in or you cannot interpret it or display it to users correctly.
Almost every stupid “my website looks like gibberish” or “she can’t read my emails when I use accents” problem comes down to one naive programmer who didn’t understand the simple fact that if you don’t tell me whether a particular string is encoded using UTF-8 or ASCII or ISO 8859-1 (Latin 1) or Windows 1252 (Western European), you simply cannot display it correctly or even figure out where it ends. There are over a hundred encodings and above code point 127, all bets are off.
How do we preserve this information about what encoding a string uses? Well, there are standard ways to do this. For an email message, you are expected to have a string in the header of the form
Content-Type: text/plain; charset=”UTF-8″
For a web page, the original idea was that the web server would return a similar Content-Type http header along with the web page itself — not in the HTML itself, but as one of the response headers that are sent before the HTML page.
This causes problems. Suppose you have a big web server with lots of sites and hundreds of pages contributed by lots of people in lots of different languages and all using whatever encoding their copy of Microsoft FrontPage saw fit to generate. The web server itself wouldn’t really know what encoding each file was written in, so it couldn’t send the Content-Type header.
It would be convenient if you could put the Content-Type of the HTML file right in the HTML file itself, using some kind of special tag. Of course this drove purists crazy… how can you read the HTML file until you know what encoding it’s in?! Luckily, almost every encoding in common use does the same thing with characters between 32 and 127, so you can always get this far on the HTML page without starting to use funny letters:
<html>
<head>
<meta http-equiv=“Content-Type” content=“text/html; charset=utf-8”>
But that meta tag really has to be the very first thing in the <head> section because as soon as the web browser sees this tag it’s going to stop parsing the page and start over after reinterpreting the whole page using the encoding you specified.
What do web browsers do if they don’t find any Content-Type, either in the http headers or the meta tag? Internet Explorer actually does something quite interesting: it tries to guess, based on the frequency in which various bytes appear in typical text in typical encodings of various languages, what language and encoding was used. Because the various old 8 bit code pages tended to put their national letters in different ranges between 128 and 255, and because every human language has a different characteristic histogram of letter usage, this actually has a chance of working. It’s truly weird, but it does seem to work often enough that naïve web-page writers who never knew they needed a Content-Type header look at their page in a web browser and it looks ok, until one day, they write something that doesn’t exactly conform to the letter-frequency-distribution of their native language, and Internet Explorer decides it’s Korean and displays it thusly, proving, I think, the point that Postel’s Law about being “conservative in what you emit and liberal in what you accept” is quite frankly not a good engineering principle. Anyway, what does the poor reader of this website, which was written in Bulgarian but appears to be Korean (and not even cohesive Korean), do? He uses the View | Encoding menu and tries a bunch of different encodings (there are at least a dozen for Eastern European languages) until the picture comes in clearer. If he knew to do that, which most people don’t.

For the latest version of CityDesk, the web site management software published by my company, we decided to do everything internally in UCS-2 (two byte) Unicode, which is what Visual Basic, COM, and Windows NT/2000/XP use as their native string type. In C++ code we just declare strings as wchar_t (“wide char”) instead of char and use the wcs functions instead of the str functions (for example wcscatand wcslen instead of strcat and strlen). To create a literal UCS-2 string in C code you just put an L before it as so: L”Hello”.
When CityDesk publishes the web page, it converts it to UTF-8 encoding, which has been well supported by web browsers for many years. That’s the way all 29 language versions of Joel on Software are encoded and I have not yet heard a single person who has had any trouble viewing them.
This article is getting rather long, and I can’t possibly cover everything there is to know about character encodings and Unicode, but I hope that if you’ve read this far, you know enough to go back to programming, using antibiotics instead of leeches and spells, a task to which I will leave you now.
Abstract class InputStream: clients use this to read data from different sources such as file resources using FileInputStream, internet resources using socket.getInputStream or from an in-memory byte array (ByteArrayInputStream). it has methods of int read() which reads one byte and returns an integer ranging from 0 to 255, returns -1 at the end of the file.it blocks until the end of the stream is reached or an exception is thrown. It has another method of public int read (byte[] buffer, int byteOffset, int byteCount) which reads they bytes into a buffer array start from the offset value.
FileInputStream: subclass of InputStream which reads bytes from a file but doesnt buffer the bytes. it implements the read method in InputStream class.
Bufferinputstream wraps the InputStream method, bufferInputStream = new BufferInputStream(inputStream). It will reads the input into the buffer. so if there are frequent access to the data source, it can reduce the access cost.
